About Me

My photo
I LOVE to design and to paint whimsical items that will put a smile on your face. Each day I share my simple life with you as I try to encourage, to inspire and sometimes JUST to make you smile as I recount my life growing up on a dairy farm! I've never had many material items in my life, BUT I have been blessed beyond words with love and encouragement from WONDERFUL Parents who instilled in me WHAT was important. I have had EVERYTHING that I needed and WAY too much of what I wanted. I am slowly learning to be a better person each day through my interactions with my friends on Facebook. Some day I hope to be as good as people seem to THINK I am! I am BLESSED! Welcome to my little corner of the world...Please stop by and visit often!
Showing posts with label tutorial. Show all posts

Friday, December 8, 2017

Hands to serve Him


I have been doing a 
LOT of mixed media, lately.

I enjoy it.

Well, some of it is not my favorite, but I leave that alone-😀😁😂🤣😃

I made this mitten as an ornament, several years ago. 
I have sold LOTS of them.

I know...my friend keeps asking for a pattern.😉🙄😕😛

Maybe this will work.😁😂🤣😃

This is one of my most 
favorite sayings.

I will never apologize
 for sharing my faith.

I look at my art as
 an extension 
of my ministry.

I typed my saying on a computer.

If you have a laser printer, then you can just decoupage it onto your project.

If you have an ink jet printer, you will need to spray your copy with a couple of light coats of clear spray varnish, preferably matte or satin.
If you do not do this, it will smear.

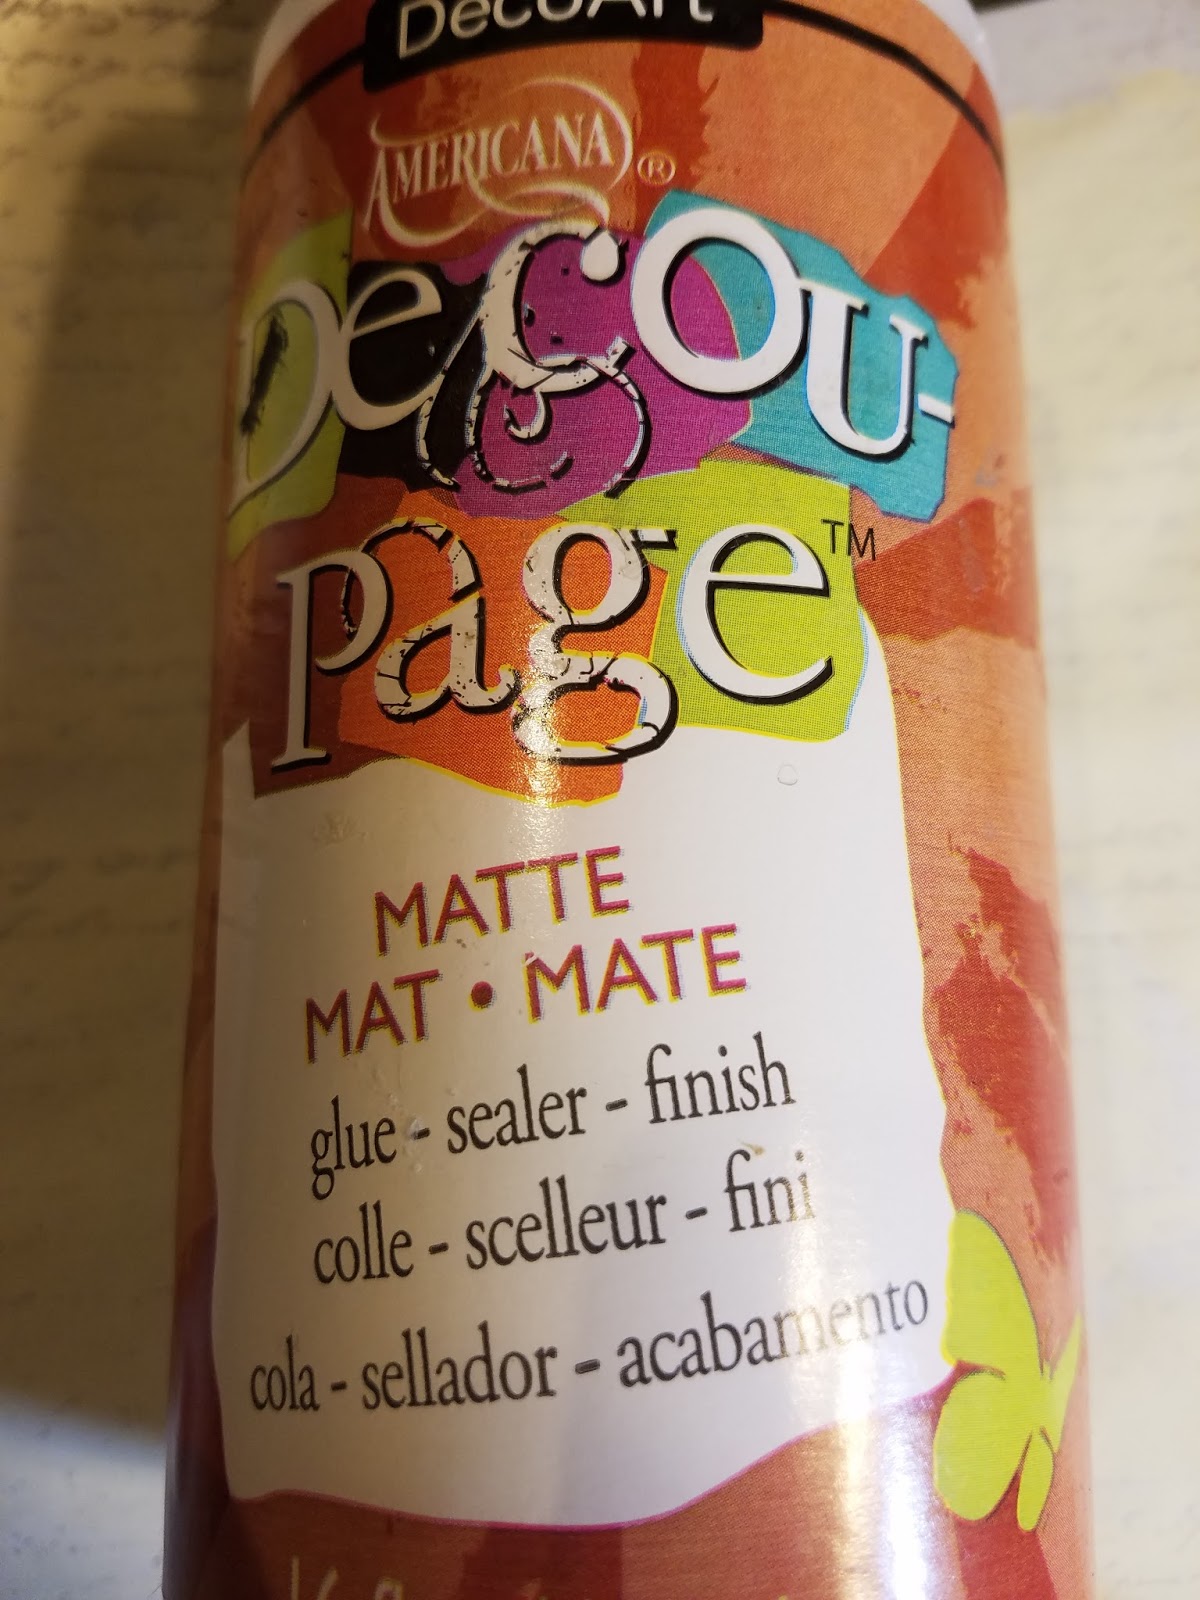
These pictures show what I used.
You adjust to what you have
and what you like.

My surface was a 4 inch canvas.


So, begin by painting your back and edges of your surface 
with the color of your choice.
I used Extreme Sheen on mine.


Tear small pieces of decoupage paper.
I use small pieces to add texture.
Use a whole piece if you wish.
Use paint if you don't want to use paper.
Attach them with Matte Decoupage.


Apply your colors of choice. 
It takes very little media paint.
I also thinned it a bit with water.
I despise wasted paint, so I used just a drop or two of each color, adding more if needed.


Cut out or paint your mitten.
Color as you wish.

I cut the heart separately.

Attach with Matte Decoupage.

I like to dry brush 
my edges with Payne's Grey.

I outlined the 
mitten and heart 
with a 
medium charcoal pencil.

The words were attached 
and lightly painted, 
because of the 
bright white paper.

If you use a Charcoal pencil, 
be sure to 
spray varnish
 your project
 so it won't smear.

Have fun putting 
your spin on a 
similar project.

I am simply blessed 
to create~charlotte♡


Yes, by all means, resize it as you wish.

It is always a kind thing to give an Artist credit when you make something similar from their pattern or instructions.😉🤗


Thursday, January 19, 2017

Rain--Tutorial Thursday

I have been trying to clean out the 
albums on my phone and 
I found these pictures.

I had participated in a 3 color challenge 
a few months ago.

I had seen a video where an Artist took Crayons and melted them for the rain, so I thought I would see what I could do with the same concept using DecoArt Media Fluid Acrylics.

For the challenge, 
we were to use Black and White 
and then choose another color.

I chose Cobalt Turquoise Hue.

I used 2 Andy Skinner Stencil: 
Children and Acessories

Whew--I am not a stenciler, but I keep trying.

I used a small spritzer for my water.
I picked up the spritzer at JoAnns.
I LOVE this little tool.


I began by creating the background with a 
mix of Black and White. 
I didn't want to over-mix my colors, 
or I would have simply ended up 
with a muddy mix of Grey.
There was no rhyme or reason 
to adding the colors.
I simply picked up some Black, 
then some white, 
then some more white, 
or some more Black...
I stopped when I liked it.
IF you do get a muddy mix, 
stop and allow the paint to dry, 
then begin again.
It is JUST PAINT!

I kept the strokes in a North/South Direction.
Of course, you can try something else.


I stenciled the children and the umbrella and 
boy, howdy, again, 
I want to emphasize that 
I cannot stencil!  LOL
BUT as I keep saying, 
it is only paint, 
so I pulled out my 10/0 liner 
and repaired the blobs as best I could.
I was a bit stressed, 
so I forgot to take pictures.

I applied painters tape to cover the children.
I wanted the rain to fall around them.


I blobbed the Cobalt Turquoise Hue across the top, 
and spritzed it with water so it would run.


This was a process..
More Paint...
More water...


Finally, I just thinned my paint really thin 
and dabbed it across the top.
I kept doing this until I liked it.
I then added some white to the Turquoise 
to give it some depth.
Remember--Shading (dark) pushes your object 
BACK into the background.
Highlighting (light) brings the object 
to the FRONT.
Your goal is to have a 
shadow, the primary color, and a highlight
Of course, you can use many colors 
and layers to achieve this.
That is the fun of playing with paint.


I added a white Highlight between the children.
I thought of it as a lamplight.
Black was added under the children to ground 
them into the picture.
The lettering was added with Black.
I dry brushed Black all around the edge 
to give it a FRAME


This was a very quick project.
This is an example of being able to create ART 
without having great artistic skills.
I always want people to know that 
THEY CAN CREATE.
Things like this are great ways to learn 
shadows and highlights.
As with anything~~
PRACTICE PRACTICE PRACTICE

I hope that YOU make time to 
do things that you love.

Grab a canvas,
3 bottles of paint
Some brushes
and 
CREATE!!

I am simply 
blessed to create~charlotte♡

Thursday, October 20, 2016

Tutorial Thursday: Snowman Nodder

I have had these little round "heads" falling off my table for 2 or 3 years, so I decided to do something with, well, at least one.

I had bought them from a fellow team member on Etsy.

I gathered my old rusty bed spring that is really cool and 
different from most--bought on, of course, ETSY.

I gathered some supplies.

Oh, who am I kidding.  The supplies were already sitting on my paint table from another two or three or four projects!!


This project was mostly about waiting for paint to dry!

Story of my Life!

I covered the cloth head with DecoArt Dimensional Effects Paintable Texture Paste.
I spread it with my pallet knife.
I added the texture with an old brush by dabbing the brush into the Paste.

I sat it aside to dry.

When it was almost dry, I added the 
paste to the bottom of the head.

When dry, I dry brushed Titanium White all over.  I didn't worry about getting a good coverage, since I knew I would antique it.  This added another depth of color to the piece.

I made the nose, mouth and eyes out of QuikWood.
I spread the nose out at the base as much as possible to blend into the head.

I let this dry.

I added more of the Dimensional Paste around the bottom of the nose to blend it all together.

Again, I dry brushed more Titanium White over 
all of the QuikWood.


I made some ice cycles out of the QuikWood and 
added them to the bedspring.

More Drying.

I added the eyebrows with the Textured glass--I am determined to find a use for it that I can't live without! Lol

More drying...


Charcoal is bored by the whole process!


I added color to the cutie and these are the supplies I used.
After the painting was finished, I antiqued the entire head.
Snow was added with the Texture Glass and with Snow-Tex.


This is the little Nodder all finished.


You can use most anything for the head~~
a gourd, paper Mache, or a Styrofoam Ball.

Use the supplies you have on hand.

He would look adorable with a black hat or a stocking hat, 
or even a sculpted hat.

Have fun and get to creating!  
Christmas is coming. 
Think about making Christmas more about the MEMORIES this year...sometimes, that is all that is left.


Oh, and Santa Clause is Watching YOU!
Yes, I BELIEVE  in the magic.

Thank you for stopping by my little corner of the world.

I am simply blessed to create~charlotte♡


Thursday, October 13, 2016

Technique Thursday: Multi Surface Paint

Well, now, I guess I thought the elves would finish this post for me.
There they were, just sitting on the shelf above the laptop.


I did, after all, add all the pictures and then promptly 
went about my day doing...

hmmmmm...what was I doing?

I do remember there was some ice cream at one point.
Oh, well, WELCOME to my world! 

I thought I would share some tiles that I painted using 
DecoArt Multi-Surface Satin Acrylics


I had a special order for 4 tiles.
I have a habit, not necessarily a bad habit, of painting more than needed so my customer can have a choice.
I want them to be happy.
So, these are the tiles that I painted.
She chose the first four.


This is a design by Betty Bowers that 
I painted using these paints.
Isn't he cute!!


I haven't used this paint for very many things.
It is very similar to using water-based Enamel Paint.
You can't add water to it, or it will ruin its adhesive quality.
I have no problems with not using water since I learned to paint using the "dirty brush" method, 
meaning that I added my highlights/shading by working them in with the base coat.
It was all I knew to do, and it is similar to 
how one would paint with oils, 
but I have never done that, either...LOL

These paints are very translucent, so I base my design with white.
You may add White to your paint to help make them more opaque,
 but I am ok with that; however, I DO wish the black were opaque, 
but I can live with it for a bit.


I free-hand many of my paintings.

The colors I used were:
Black Tie, Cottonball, Pumpkin Patch, Paprika, True Blue, leprechaun, coffee bean, muted Gold, eggplant, red barn


Shake the bottles really well.
I discovered that the paint seems to separate easily.
I thought I would share how to paint a very easy bird.
I showed you how to paint a pumpkin, so let's add to it.
Start by making a ZERO for the bird's body.


Add the two sides to the Pumpkin and add the tail to the bird, simply by making a rectangle.
Make the end of the tail jagged.


Base the colors.  
For the bird, I added White to the True Blue to make it lighter.
Notice on the bird, I left a little of his belly white.
I also added two little lines for his beak.
I added two coats of each color.


I thinned the Red Barn and added it to the belly.


 Add the beak with Muted Gold.
Use a flat brush and add Paprika to the edges of the pumpkin.
I added some Muted Gold to inside the pumpkin, too.
Add the eye to the bird with Black Tie, 
followed with a dot of cottonball.
Using the darker True Blue, add some lines to the tail 
and add a little to the top of the bird.
Outline with Black Tie.


Add a vine with Black Tie.


Use a White Charcoal pencil to make a line to 
write a message across the top,
Notice how icky the writing is?
Add "berries" with Eggplant.
Mix some cottonball with the eggplant 
and go over the "berries" again. 
The leaves are leprechaun.


Go over the writing again, and it looks fine.
I tried to use the very tip of the liner brush 
and kept a good amount of paint on the tip.

hmmm...not the best writing, but not too bad...
I think I will scratch off that "i" 
and try that again...LOL

Hey, it is JUST PAINT!


I hope this will inspire you to try some painting.
Really, anyone can do it IF they wish to!
Share with me if you try to paint this or something similar.
It never hurts to have a "birdie in your pocket" to paint!

Thanks for stopping by my little corner of the world.
Leave me a comment, if you wish.
I love to get to know YOU.
 I am simply blessed to create~charlotte♡