About Me

My photo
I LOVE to design and to paint whimsical items that will put a smile on your face. Each day I share my simple life with you as I try to encourage, to inspire and sometimes JUST to make you smile as I recount my life growing up on a dairy farm! I've never had many material items in my life, BUT I have been blessed beyond words with love and encouragement from WONDERFUL Parents who instilled in me WHAT was important. I have had EVERYTHING that I needed and WAY too much of what I wanted. I am slowly learning to be a better person each day through my interactions with my friends on Facebook. Some day I hope to be as good as people seem to THINK I am! I am BLESSED! Welcome to my little corner of the world...Please stop by and visit often!
Showing posts with label Snowman. Show all posts

Wednesday, December 7, 2016

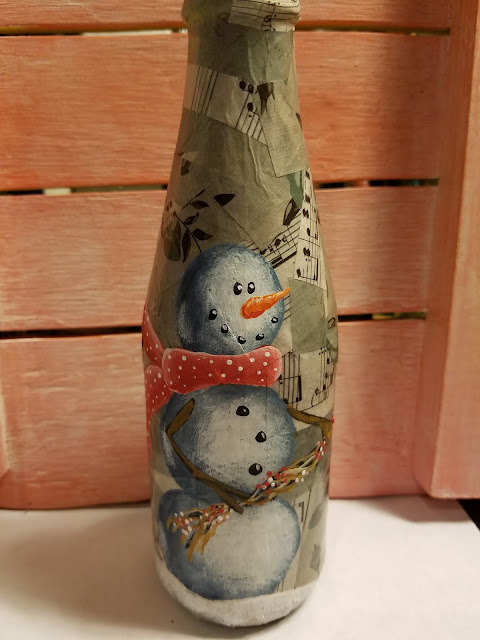
Snowman Bottle


I was looking for some painted bottles that I did several years ago, and I think I gave most of them away.

So, as I was thinking about painting another one or two, I saw my 3 packages of DecoArt DecouPage Paper sitting near my work area, and I thought, I think I will try to use some of this on the bottles and then paint a snowman on the paper!  

This paper is very thin and easy to work with.   It is similar to wrapping paper.

Of course, my favorite is the music paper~~I have used it for several projects.


I am not going to go into how to paint a snowman, but I am sharing this link with you for some fun Circle Snowmen that a friend did to show me HOW to paint them.  I love to learn new techniques.


The bottles I used are from the Dollar General Store--they were Sparkling Cider--one of my favorite Christmas Treats, each year.
I don't drink alcohol, so this is just a fun change from my REAL COKES...lol

You can find some neat drink bottles

To prepare them, I simply rinsed them out, and then pulled the labels off.  They weren't sticky labels, so I sanded them and wiped them clean--they are going to be covered in glue! 


I cut several pieces of paper and found that longer, skinny pieces of paper were best and didn't wrinkle so much.

I used an old scruffy brush to add lots of DecouPage (Matte is what I used) on the bottle and smoothed out the paper with the brush.  I made certain to have glue under all of the paper and on top of it.


Just keep gluing and smoothing until you get it all covered.
I then brushed a very heavy coat of the DecouPage
 on top and allowed it to dry.


You will find some spaces that weren't covered, so just add them


I free-handed the snowmen bases with 
circles of a medium Blue.


This is one of the snowmen.


And the other snowmen...
just some different angels of the snowmen, 
so you can see.


These are the colors I used.
I used the Matte Decou-Page  to seal my snowmen, 
and then spinkled this fine dust over them and they are sparkly!!  LOL The pictures don't show that, though...


Just another fun idea for you to enjoy.

I hope that you are taking time to enjoy this Advent Season!

I am simply Blessed to create~charlotte♡

Uodate: after meaning to paint a Tag, for over a tear, to add to tgem, I out fur around the tops! Aren't they fancy smancy?!
😁😂🤣😃


Thursday, October 20, 2016

Tutorial Thursday: Snowman Nodder

I have had these little round "heads" falling off my table for 2 or 3 years, so I decided to do something with, well, at least one.

I had bought them from a fellow team member on Etsy.

I gathered my old rusty bed spring that is really cool and 
different from most--bought on, of course, ETSY.

I gathered some supplies.

Oh, who am I kidding.  The supplies were already sitting on my paint table from another two or three or four projects!!


This project was mostly about waiting for paint to dry!

Story of my Life!

I covered the cloth head with DecoArt Dimensional Effects Paintable Texture Paste.
I spread it with my pallet knife.
I added the texture with an old brush by dabbing the brush into the Paste.

I sat it aside to dry.

When it was almost dry, I added the 
paste to the bottom of the head.

When dry, I dry brushed Titanium White all over.  I didn't worry about getting a good coverage, since I knew I would antique it.  This added another depth of color to the piece.

I made the nose, mouth and eyes out of QuikWood.
I spread the nose out at the base as much as possible to blend into the head.

I let this dry.

I added more of the Dimensional Paste around the bottom of the nose to blend it all together.

Again, I dry brushed more Titanium White over 
all of the QuikWood.


I made some ice cycles out of the QuikWood and 
added them to the bedspring.

More Drying.

I added the eyebrows with the Textured glass--I am determined to find a use for it that I can't live without! Lol

More drying...


Charcoal is bored by the whole process!


I added color to the cutie and these are the supplies I used.
After the painting was finished, I antiqued the entire head.
Snow was added with the Texture Glass and with Snow-Tex.


This is the little Nodder all finished.


You can use most anything for the head~~
a gourd, paper Mache, or a Styrofoam Ball.

Use the supplies you have on hand.

He would look adorable with a black hat or a stocking hat, 
or even a sculpted hat.

Have fun and get to creating!  
Christmas is coming. 
Think about making Christmas more about the MEMORIES this year...sometimes, that is all that is left.


Oh, and Santa Clause is Watching YOU!
Yes, I BELIEVE  in the magic.

Thank you for stopping by my little corner of the world.

I am simply blessed to create~charlotte♡


Thursday, August 18, 2016

Tutorial Thursday: Winter Village

What a fun project.

I know...you all are sick of seeing the same project over and over. 


I  apologize. I really do work hard to not over share myself, but if I don't promote my stuff, whose responsibility does it become?

So, please just smile, roll your eyes and go forth with your day. I really do understand! 


I also want to thank you all for your support and encouragement. It means so much to me. I Hope that I somehow, return the love!

I thought I would show my finished box. It has taken me since Saturday to finish it...good grief, right?!


I have painted crooked houses...wonky windows and then, just as the villagers were settling their lawsuits against the contractor, what happens, but that a GIANT SNOWMAN builds his Church on top of the box!!

The Winter Village is a pattern for the Puddles of Paint Club (POP) by Susan Kelley. It is a fun group...we get a pattern each month a year before any one else--how cool! Click here to go to Susan's website.


I am not the best Saltbox painter, but it still turned out pretty adorable, despite me...lol

I designed the snowman to go on top of the box. 


All of this was a fun paint, and now the pattern for the snowman and the actual painted Box is available in my etsy shop By clicking here for the box and by Clicking here for the pattern.


I used DecoArt Glass Texture for the snowman and for the icicles. I'm not sure how I feel about it. Honestly, I need to work with it some more...anybody out there got any ideas how to better use it?? Lol.


I  do like how shiny it was. I like the texture it created.

 I added white paint to mine. I really didn’t see much difference between it and the dimensional effects, so time will tell. It could be one of those things that I will learn that I can't live without! Lol


So, I am not sure that I have been very helpful today!

Grab your paints, or scissors, or crochet needles, or knitting needles and create!!


If you want to learn something that I know, please ask...I will do my best to help...


I am simply blessed to create~charlotte ♡


Friday, December 4, 2015

In the kitchen we can build a snowman, Friday, December 4, 2015

I thought I would share a very quick and easy craft.

It took about 5 minutes for me to gather my supplies, take pictures and make 2!

You will need:
Hershey Nuggets
Address Labels
Sharpie Pen-fine
Gloves
Scissors
Markers or Colored Pencils or Crayons or Paint...whatever you have...
You will probably have everything on hand except for the candy...this would be a good way to use those ONE gloves that didn't get lost...
I discovered that because the candy is curved, the label won't go on straight, but if you will move the label just a tad past the bottom, it will cover the candy wrapper. I know this will drive some of you crazy, but not me! Trim it if you wish.
If you cut the hat longer, you can roll it up to make a cuff and help with fraying.
Isn't this cute! I  think I will put a drop of hot glue on the back of the hat to hold it on! It will still be easy to get to the candy.
I did 2 different mouths. One was just a smile and the other had pieces of coal for the smile. I used an orange colored pencil to color the nose and to put cheeks on mine.

Do as you wish and make yours as you like them! I do not like things without a mouth!! As my nephew once told my Momma, you can make them "any how" you want!  (Sweet memory)

This shows a better picture of the pen I use. I keep a package of these for all of my crafting needs...I love these fine tipped markers!

These are too funny!
They would be great to put on the table for guests...
To attach to packages...
To leave on your co-workers desk...

Don't get upset if that ONE person immediately opens it and eats it! :(

Then, there will be that one person who keeps it until it rots!

Gather the family together for some quick crafting...The family that crafts together, hmmmm...you might run out of candy!

Have fun making some heart memories. ..I still smile remembering making candy cane reindeer with Momma.

I wish Blessings to YOU...~~charlotte♡