About Me

My photo
I LOVE to design and to paint whimsical items that will put a smile on your face. Each day I share my simple life with you as I try to encourage, to inspire and sometimes JUST to make you smile as I recount my life growing up on a dairy farm! I've never had many material items in my life, BUT I have been blessed beyond words with love and encouragement from WONDERFUL Parents who instilled in me WHAT was important. I have had EVERYTHING that I needed and WAY too much of what I wanted. I am slowly learning to be a better person each day through my interactions with my friends on Facebook. Some day I hope to be as good as people seem to THINK I am! I am BLESSED! Welcome to my little corner of the world...Please stop by and visit often!
Showing posts with label painting project. Show all posts

Tuesday, October 4, 2016

Tutorial Tuesday: White Pumpkin Domino

I wanted to see if I could translate my White Pumpkin 
from a couple of weeks ago to a small domino.

So I gathered a few dominoes.


I slung a mix of Winter Blue mixed with an equal amount of DecoArt Paint Adhesion onto some Dominoes.
I usually do a bunch at a time, so I have them available 
when I get in the mood to paint them.

It doesn't matter what color you base them.  
I just wanted to get the Paint Adhesion painted onto 
the surface for a good adhesion.
After this is done, I can paint them any color that I wish.


This is after a coat of Winter Blue/Paint Adhesion.


Add the color you wish your background to be.
But today, I didn't use these.
This is for another top secret project...
Well, not really, but it sounded very secretive!

These are the colors I used for the project.
Oh, plus Titanium White.
(She was being Shy and didn't want to be photographed.)


I added the above colors to the surface using 
Dry Wall Tape as a stencil.
See the YUMMY Texture!


This shows the steps I do to free-hand a pumpkin.
I start with an oval in the center.
I add a "hump" on one side.
Then one on the other side.
Ok, it is more like half of an oval, instead of a "hump"


This is after 3 quick coats of Titanium White.


With a small flat brush (#4)
Load Titanium White on the brush
Pick up some Raw Sienna on the edge.
Work the paint into the brush by stoking it in the 
SAME PLACE on your pallet to blend the Raw Sienna 
into your brush.  You do NOT want the Raw Sienna 
to go all the way across the brush.  You want it to 
remain in that same spot that you loaded it.


The edge with the Raw Sienna is placed on the 
edge of the piece where you want it to be shaded.

This shows the stages of shading, with the last pumpkin 
showing the shading as complete.


I added the stems with Raw Sienna.
I painted 3 different stems to show you that it 
doesn't matter how you paint them.
Stems are imperfect in nature, so reflect it in your painting.
It is hard to tell, but I added some Hauser Light Green 
to the middle sections of each pumpkin.


With a 10/0 liner, I added Burnt Umber around the edges 
of the stem.  If it got too fake looking, I just blended it 
back with some more of the Raw Sienna.
I added a bit of Titanium White to the Raw Sienna to 
add a highlight to the top of the stem.


Again, it is really tough to tell, But I added some of the amazing 
White Pearl Dazzling Metallics to the Pumpkins. 
 It is really cool in person.
Curling Stems were added to the bottom of the stem 
with the Burnt Umber and the 10/0 liner.


The STARS of the Show!


I dabbed (not brushed) a good deal of the Crackle Medium 
around the pumpkin.
I allowed it to air dry for an hour.
See the shimmer on the Pumpkin from the Dazzling Metallic.


I brushed Deep Midnight blue around the Pumpkin.
I wiped it off with a damp cloth.
Isn't this exciting.
Cheryl Jones--Where are YOU?!!


The domino on the left shows the Deep Midnight blue 
before it was wiped off.


Isn't this FUN!!
Now, should I write a word across the top?


I love playing!!


I wish you a happy week and hope you get to play, too!


I am simply blessed to create~charlotte♡


Tuesday, September 27, 2016

Tutorial Tuesday: Grateful Pumpkin

Who doesn't like to get some Happy Mail?

I got a box of goodies from DecoArt, Where I am a helping Artist and a member of their Blog Outreach Program.

I could not WAIT to try out the new items I received.

Projects started running through my mind, but really, 
that is nothing new.

I have said this before, but I have used DecoArt products for years. 
 I have probably bought thousands of bottles of 
DecoArt Americana as I prepped for craft shows.  
They simply were the best on the market!

Recently, I got rid of every bottle of my other paints that I bought when I couldn't get to the Mall to buy DecoArt...Sadly, 
Walmart doesn't carry this great brand.  :(

I thought of several things to paint, but I decided that I would make my own "pallet" pumpkin.
Those pallets items are expensive!


I cut the plywood into the shape of a pumpkin.
You know, I most always give you a pattern, but really?  You can find a pumpkin shape anywhere AND you can simply draw one.  
An easy way is to draw a rectangle the size you want the pumpkin, Then take a piece of chalk and draw the shape--easy peasy!

After I cut the shape, I cut it into strips, and really, 
I am OK with knowing that they would not be straight.

I also cut 2 pieces of scrap 1x4s to size to use as braces. 

Again, nails don't bother me when they show.  
I would rather use nails than have my piece to fall apart.

With that said, you can simply glue and clamp, if you wish. 


I painted the pieces with DecoArt Americana Chalky Finish Paint in Cherish (the orange-ish color), Bestow (light green) and rejuvenate (yellow)


I took the 3 middle pieces and a White Charcoal pencil
 and free-handed my word of choice.


I painted the word with Chalky Finish in Honor.
All of my primitive painting friends, 
THIS is the color I think you will be excited to add to your stash!
It is a dark Navy--almost black and oh, so yummy!


I sanded it.
I Added some birds and branches using 
the Americana Feathered friends Stencil.

I Added the White Creme Wax--
oh, my, this is WONDERFUL stuff to give 
your project that easy white wash look.

It was too white for my taste, but no problem, 
I took the Clear Wax and rubbed it on top 
of the White Wash and it removed some of it!!


From Top to Bottom: Bestow, Cherish, Clear Wax, 
White Creme Wax, Honor, Rejuvenate, 
Ultra-fine Writer Tip on top of Titanium White Americana Acrylic.


Charcoal wanted to see the new colors I got, too.
Oopsie...there goes a bottle rolling...


Momma won't notice if I lie on top of the paint, 
but that bottle that rolled!  Ugh, what to do?!


I put a thin line around the pumpkin with that 
awesome Ultra-fine writer.
I can't wait to try it on top of Lamp Black to 
outline some of my designs!

The top cleaned easily!


This is the back of the piece painted with Cherish.
I LOVE the white washed surface.


This can either hang or it would be great to sit on top of the table with some other fall items around it.


I hope I have inspired you to try the new colors!
Many are available at Michaels, but you can also 
order from the DecoArt Store by clicking here.


Thank You, DecoArt.
I hope you like what I do with your products.
I am simply blessed to create~charlotte♡


Wednesday, August 31, 2016

A Beautiful Day in the Neighborhood

I  thought I would try something different...

CLICK HERE to see a slideshow of my latest piece of art!

This really is a work of heART...

I wanted to make you SMILE as I shared some childhood memories and some things I love.

The church is in the middle  (well, kinda) to show that my Faith is the center of my being...

Our house was filled with love...
Our hands and our minds were kept busy creating and working...

Candy was homemade or bought for...REALLY--A PENNY!!

Our life was filled with COLOR!

I was taught to love and to respect the land and her inhabitants...

Clouds were there to entertain us as we hunted objects in the sky...

A tree to remind me of deep roots...to stand tall...to weather the storms of life...to stand for what is merciful and just...to grow...to spread my wings...

A sheep is a reminder that I wish to follow THE GREAT SHEPERD as He leads, comforts, protects and fights evil for me...


A dog, cat, owl--nature is to be cared for...

A frog to remember the laughter as Mother told about the BIG MOUTH FROG...

Beautiful flowers...Mother made gorgeous arrangements for our church altar...

Flowers to remind me to BLOOM...

Sunflowers as a reminder of feeding the birds and being planted by Daddy on the side of the road...

Black and white to remind me of our farm colors, Roma Land Farm, that reflected our Holstein cows that were milked to provide our income...

Homemade happiness!!


We all have a path to follow...

Our journey should be filled with good things...learning from our trials and roads we should have avoided...

Each day, I try to wake grateful...to reflect on the goodness and to follow my dreams!

The love of my parents really does flow through each stroke of my brush that is filled with DecoArt  Paint!
 (see how I snuck that in there! Lol)

Thank you for visiting
 my little corner of the world!

 I do not take my blessings for granted...
I am simply blessed to create ~charlotte ♡

Sunday, April 19, 2015

Porter's Lighthouse, Sunday, April 19, 2015

I never realize how comfortable I am in my own little painting world UNTIL I step out of my NORMAL realm and my friends are all shocked!

I am a self-taught painter and I have painted LOTS of different things trying to find my niche and learning new techniques.

I painted a few years before I learned the technique of floating.  I had grown to love the "dirty brush" method (figures, huh) to get my highlights and shadows.  I am glad that I did that because it taught me about PAINT!

My friend, Lynn, of Painting Thyme Needfuls, was painting a piece by Rebecca Trimble, so I was inspired.

This was the first step...looks just like the finished product, huh?!  LOL
I dug through the 2 books I had and changed my mind about 
10 times as to THE ONE that I wanted to paint....

Next came washes to establish the land and the sea...
 
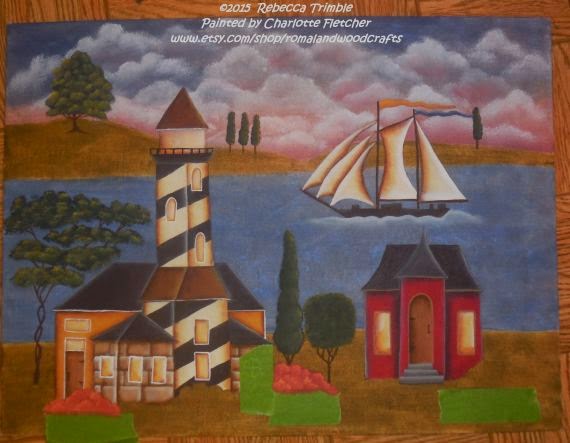
I FINALLY decided that I would paint a Pattern Packet called, PORTER'S LIGHTHOUSE.
Yes, I went a BIT CRAZY with the clouds, but they are so fun to paint!
 The pattern was for an 11x14 picture, 
but I only had a 12x16 canvas, so that is what I used...
it seemed to fit perfectly...
SOMETIMES I THINK we get hung up on making certain 
we have the EXACT colors and surfaces for a painting...
ME? I do the best I can!!

I did NOT have Spicy Mustard or Autumn Red, so I used my favorite colors of TUSCAN RED and MARIGOLD.
 I am not a great fan of painting STRAIGHT lines...
I paint mostly frogs, daisies, and ladybugs and 
EVERYTHING has a smile on its face...
I added tape to paint on the bushes to keep the bottoms straight...
 I LOVED the red house in this design and the colorful bushes
 just added that extra HAPPY COLOR that I love to paint!
I added some shading to PLANT the designs into the ground...
 As painters, we seem to see WHAT we don't like as 
opposed to what we DO like...
WHY is that?
This is the finished design.
As I finished the painting, 
I KNEW that mine looked little 
like the original...
I am CERTAIN my washes were too heavy, but you know what?
I LOVE IT!!
....hmmmmm....as I look at the original, I see that I did not put a shaded line down the middle of the lighthouse...
I can EASILY fix that!...LOL

This is the Original picture from the pattern packet.


As one who designs, my goal is to give a GUIDELINE for someone...I don't want carbon-copies...I WANT people to put THEIR styles into what they paint

If you are interested in purchasing Rebecca's patterns, and WHY would you NOT...
CLICK HERE to go to Rebecca's website.

I can honestly say, that I had FUN stepping out of my 
COMFORT ZONE to paint this beauty!
 * * * * * * * * * * * * * * *
As I said, I got WAY TOO CARRIED AWAY with painting the clouds, but a friend asked me if they were hard to paint...With me being me, of course, I did not follow the directions in the packet...I did them the way I had done them before...
bad me...BAD BAD ME!

GLORY NO!!  They are so easy, so I have included step-by-step picture below to show you in case you want to paint some this way...I have fun finding NEW WAYS to do this and when I got my MOP BRUSHES, this seemed like a good use for them... 

OF COURSE, I used DecoArt Americana PAINTS, as I always do...I THINK they are the best for MY paintings! 

I painted the sky with UNIFORM BLUE AND KHAKI TAN using a slip-slap motion...don't have a solid covering.

When Dry, add a wash of clean water

Add the SHAPE of your Cloud with a deerfoot Brush...you can use an old scruffy brush, also...

Using the MOP brush, gently tap, starting at the bottom and working to the top, softening the color. I didn't like the first one, so I just added some more paint...

This is what it looks like after I MOPPED it...

I added more White paint for another cloud...Only work on 2 or 3 clouds at a time because the paint will dry and you will not get the softened look that is the goal!

This is after they have been mopped...you can add some COLORS in here using the same method, if you wish, OR add a VERY LIGHT WASH of another color to the bottom of the clouds, but that is the method!!

People remind me of painting...SO MANY LAYERS...What you start with is not always what you THINK it will be...we NEED a FOUNDATION to make us STRONG...
Some People are worth peeling back the layers to FIND what makes them WHO they are...

I am THANKFUL for all of my friends who take the time to get to know me...I HOPE that it has been worth the effort...

Here's hoping that you will enjoy this DAY that was created JUST for us and that you will USE the talents you have been gifted...
As always, I WISH...Blessings to YOU...~charlotte