About Me

My photo
I LOVE to design and to paint whimsical items that will put a smile on your face. Each day I share my simple life with you as I try to encourage, to inspire and sometimes JUST to make you smile as I recount my life growing up on a dairy farm! I've never had many material items in my life, BUT I have been blessed beyond words with love and encouragement from WONDERFUL Parents who instilled in me WHAT was important. I have had EVERYTHING that I needed and WAY too much of what I wanted. I am slowly learning to be a better person each day through my interactions with my friends on Facebook. Some day I hope to be as good as people seem to THINK I am! I am BLESSED! Welcome to my little corner of the world...Please stop by and visit often!
Showing posts with label DecoArt Helping Artist Program. Show all posts

Friday, May 19, 2017

One Petal, 2 petals, 3 Petals, 4!

Why would I ever agree to try to duplicate something!

Good grief.

Once you do it, it is a one of a kind.

But my friend asked for tips, so tips I shall give. Well, I will share pictures. 

Nope, the second one was not like the first one and the third was like neither the first  nor the second.

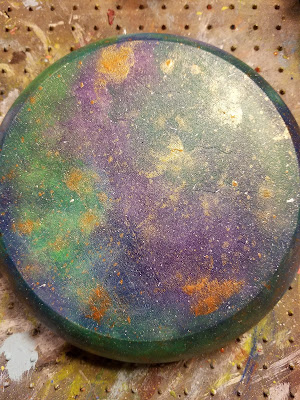
My background insisted on being darker and richer, so I just went with it!

The technique is the same, just don't add as much paint!

I have painted flowers for years,  but started enjoying the whimsicals more and more, so I had not painted a flower in several years.

I have a college friend that likes hydrangeas, so I planned to paint her this bowl before Christmas. Yes, I finally did last weekend, and she FINALLY got it as a RAK on Wednesday.

Yep, I am nothing if not the world's best procrastinator!  
Mother said that whatever you do, do the best you CAN!
I am an expert.  Of course, we all know that an expert is only a drip under pressure!  ;)

I learned to paint flowers mostly from Donna Dewberry books and books by Ross Stallcup. I changed them to suit my taste, as most painters should. I was AMAZED to find that some designers do NOT like people adding their own touches to designs.  I won't give my opinion on that, but you can probably tell! Lol

I feel kinda silly adding my tips for painting a hydrangea, since there are TONS of patterns out there. I recently bought a video from Maureen Baker, and discovered I had been doing it right, all along, not that I am certain there IS a right way.

There probably are lots of videos on YOUTUBE,  also.

But here I am...sharing that YOU can do this.

I will put a "pattern" in my etsy shop, so click on this link to go  To my etsy shop.  The price is $5 for those who wish to have this in pattern form.

Hey, visit my shop and see what I do.  ;)

I use filberts to paint most all of my flowers.  Use the appropriate size for the surface you are painting

The background was created using DecoArt Media Fluid Acrylics: Cobalt Turquoise Hue, Dioxazine Purple, Yellow Green Light.

I flecked it with my choice of  Dazzling Metallics.

You may chose any color to paint your flowers.  Choose a dark (pretty dark), medium and a Light Color--most any of the whites would work.

Hydrangeas come in many different colors.

For the stems/leaves, use your favorite greens. Again, choose a Dark, medium and light green.

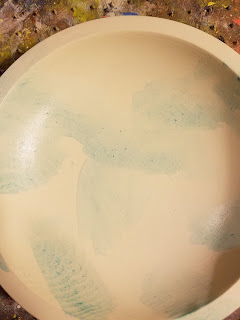
Here are the step by step pictures.

Enjoy and I hope you will give it a try!


sorry, this is out of order, but I didn't want to have to move it...


This was the original piece

These are the 2 that
I did trying to duplicate
the first one...heavy sigh...LOL


Here is the link to buy the pattern for the hydrangea

I hope you will try different things.
Learning is fun!
I am simply blessed to create ~ charlotte♡




Thursday, October 20, 2016

Tutorial Thursday: Snowman Nodder

I have had these little round "heads" falling off my table for 2 or 3 years, so I decided to do something with, well, at least one.

I had bought them from a fellow team member on Etsy.

I gathered my old rusty bed spring that is really cool and 
different from most--bought on, of course, ETSY.

I gathered some supplies.

Oh, who am I kidding.  The supplies were already sitting on my paint table from another two or three or four projects!!


This project was mostly about waiting for paint to dry!

Story of my Life!

I covered the cloth head with DecoArt Dimensional Effects Paintable Texture Paste.
I spread it with my pallet knife.
I added the texture with an old brush by dabbing the brush into the Paste.

I sat it aside to dry.

When it was almost dry, I added the 
paste to the bottom of the head.

When dry, I dry brushed Titanium White all over.  I didn't worry about getting a good coverage, since I knew I would antique it.  This added another depth of color to the piece.

I made the nose, mouth and eyes out of QuikWood.
I spread the nose out at the base as much as possible to blend into the head.

I let this dry.

I added more of the Dimensional Paste around the bottom of the nose to blend it all together.

Again, I dry brushed more Titanium White over 
all of the QuikWood.


I made some ice cycles out of the QuikWood and 
added them to the bedspring.

More Drying.

I added the eyebrows with the Textured glass--I am determined to find a use for it that I can't live without! Lol

More drying...


Charcoal is bored by the whole process!


I added color to the cutie and these are the supplies I used.
After the painting was finished, I antiqued the entire head.
Snow was added with the Texture Glass and with Snow-Tex.


This is the little Nodder all finished.


You can use most anything for the head~~
a gourd, paper Mache, or a Styrofoam Ball.

Use the supplies you have on hand.

He would look adorable with a black hat or a stocking hat, 
or even a sculpted hat.

Have fun and get to creating!  
Christmas is coming. 
Think about making Christmas more about the MEMORIES this year...sometimes, that is all that is left.


Oh, and Santa Clause is Watching YOU!
Yes, I BELIEVE  in the magic.

Thank you for stopping by my little corner of the world.

I am simply blessed to create~charlotte♡


Thursday, October 13, 2016

Technique Thursday: Multi Surface Paint

Well, now, I guess I thought the elves would finish this post for me.
There they were, just sitting on the shelf above the laptop.


I did, after all, add all the pictures and then promptly 
went about my day doing...

hmmmmm...what was I doing?

I do remember there was some ice cream at one point.
Oh, well, WELCOME to my world! 

I thought I would share some tiles that I painted using 
DecoArt Multi-Surface Satin Acrylics


I had a special order for 4 tiles.
I have a habit, not necessarily a bad habit, of painting more than needed so my customer can have a choice.
I want them to be happy.
So, these are the tiles that I painted.
She chose the first four.


This is a design by Betty Bowers that 
I painted using these paints.
Isn't he cute!!


I haven't used this paint for very many things.
It is very similar to using water-based Enamel Paint.
You can't add water to it, or it will ruin its adhesive quality.
I have no problems with not using water since I learned to paint using the "dirty brush" method, 
meaning that I added my highlights/shading by working them in with the base coat.
It was all I knew to do, and it is similar to 
how one would paint with oils, 
but I have never done that, either...LOL

These paints are very translucent, so I base my design with white.
You may add White to your paint to help make them more opaque,
 but I am ok with that; however, I DO wish the black were opaque, 
but I can live with it for a bit.


I free-hand many of my paintings.

The colors I used were:
Black Tie, Cottonball, Pumpkin Patch, Paprika, True Blue, leprechaun, coffee bean, muted Gold, eggplant, red barn


Shake the bottles really well.
I discovered that the paint seems to separate easily.
I thought I would share how to paint a very easy bird.
I showed you how to paint a pumpkin, so let's add to it.
Start by making a ZERO for the bird's body.


Add the two sides to the Pumpkin and add the tail to the bird, simply by making a rectangle.
Make the end of the tail jagged.


Base the colors.  
For the bird, I added White to the True Blue to make it lighter.
Notice on the bird, I left a little of his belly white.
I also added two little lines for his beak.
I added two coats of each color.


I thinned the Red Barn and added it to the belly.


 Add the beak with Muted Gold.
Use a flat brush and add Paprika to the edges of the pumpkin.
I added some Muted Gold to inside the pumpkin, too.
Add the eye to the bird with Black Tie, 
followed with a dot of cottonball.
Using the darker True Blue, add some lines to the tail 
and add a little to the top of the bird.
Outline with Black Tie.


Add a vine with Black Tie.


Use a White Charcoal pencil to make a line to 
write a message across the top,
Notice how icky the writing is?
Add "berries" with Eggplant.
Mix some cottonball with the eggplant 
and go over the "berries" again. 
The leaves are leprechaun.


Go over the writing again, and it looks fine.
I tried to use the very tip of the liner brush 
and kept a good amount of paint on the tip.

hmmm...not the best writing, but not too bad...
I think I will scratch off that "i" 
and try that again...LOL

Hey, it is JUST PAINT!


I hope this will inspire you to try some painting.
Really, anyone can do it IF they wish to!
Share with me if you try to paint this or something similar.
It never hurts to have a "birdie in your pocket" to paint!

Thanks for stopping by my little corner of the world.
Leave me a comment, if you wish.
I love to get to know YOU.
 I am simply blessed to create~charlotte♡