About Me

My photo
I LOVE to design and to paint whimsical items that will put a smile on your face. Each day I share my simple life with you as I try to encourage, to inspire and sometimes JUST to make you smile as I recount my life growing up on a dairy farm! I've never had many material items in my life, BUT I have been blessed beyond words with love and encouragement from WONDERFUL Parents who instilled in me WHAT was important. I have had EVERYTHING that I needed and WAY too much of what I wanted. I am slowly learning to be a better person each day through my interactions with my friends on Facebook. Some day I hope to be as good as people seem to THINK I am! I am BLESSED! Welcome to my little corner of the world...Please stop by and visit often!
Showing posts with label DecoArt Americana Acrylics. Show all posts

Friday, May 19, 2017

One Petal, 2 petals, 3 Petals, 4!

Why would I ever agree to try to duplicate something!

Good grief.

Once you do it, it is a one of a kind.

But my friend asked for tips, so tips I shall give. Well, I will share pictures. 

Nope, the second one was not like the first one and the third was like neither the first  nor the second.

My background insisted on being darker and richer, so I just went with it!

The technique is the same, just don't add as much paint!

I have painted flowers for years,  but started enjoying the whimsicals more and more, so I had not painted a flower in several years.

I have a college friend that likes hydrangeas, so I planned to paint her this bowl before Christmas. Yes, I finally did last weekend, and she FINALLY got it as a RAK on Wednesday.

Yep, I am nothing if not the world's best procrastinator!  
Mother said that whatever you do, do the best you CAN!
I am an expert.  Of course, we all know that an expert is only a drip under pressure!  ;)

I learned to paint flowers mostly from Donna Dewberry books and books by Ross Stallcup. I changed them to suit my taste, as most painters should. I was AMAZED to find that some designers do NOT like people adding their own touches to designs.  I won't give my opinion on that, but you can probably tell! Lol

I feel kinda silly adding my tips for painting a hydrangea, since there are TONS of patterns out there. I recently bought a video from Maureen Baker, and discovered I had been doing it right, all along, not that I am certain there IS a right way.

There probably are lots of videos on YOUTUBE,  also.

But here I am...sharing that YOU can do this.

I will put a "pattern" in my etsy shop, so click on this link to go  To my etsy shop.  The price is $5 for those who wish to have this in pattern form.

Hey, visit my shop and see what I do.  ;)

I use filberts to paint most all of my flowers.  Use the appropriate size for the surface you are painting

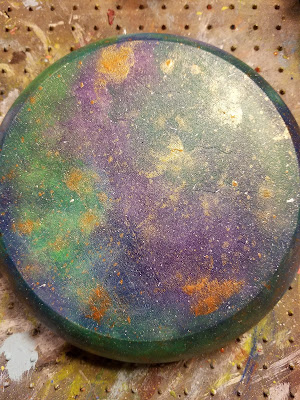
The background was created using DecoArt Media Fluid Acrylics: Cobalt Turquoise Hue, Dioxazine Purple, Yellow Green Light.

I flecked it with my choice of  Dazzling Metallics.

You may chose any color to paint your flowers.  Choose a dark (pretty dark), medium and a Light Color--most any of the whites would work.

Hydrangeas come in many different colors.

For the stems/leaves, use your favorite greens. Again, choose a Dark, medium and light green.

Here are the step by step pictures.

Enjoy and I hope you will give it a try!


sorry, this is out of order, but I didn't want to have to move it...


This was the original piece

These are the 2 that
I did trying to duplicate
the first one...heavy sigh...LOL


Here is the link to buy the pattern for the hydrangea

I hope you will try different things.
Learning is fun!
I am simply blessed to create ~ charlotte♡




Tuesday, September 27, 2016

Tutorial Tuesday: Grateful Pumpkin

Who doesn't like to get some Happy Mail?

I got a box of goodies from DecoArt, Where I am a helping Artist and a member of their Blog Outreach Program.

I could not WAIT to try out the new items I received.

Projects started running through my mind, but really, 
that is nothing new.

I have said this before, but I have used DecoArt products for years. 
 I have probably bought thousands of bottles of 
DecoArt Americana as I prepped for craft shows.  
They simply were the best on the market!

Recently, I got rid of every bottle of my other paints that I bought when I couldn't get to the Mall to buy DecoArt...Sadly, 
Walmart doesn't carry this great brand.  :(

I thought of several things to paint, but I decided that I would make my own "pallet" pumpkin.
Those pallets items are expensive!


I cut the plywood into the shape of a pumpkin.
You know, I most always give you a pattern, but really?  You can find a pumpkin shape anywhere AND you can simply draw one.  
An easy way is to draw a rectangle the size you want the pumpkin, Then take a piece of chalk and draw the shape--easy peasy!

After I cut the shape, I cut it into strips, and really, 
I am OK with knowing that they would not be straight.

I also cut 2 pieces of scrap 1x4s to size to use as braces. 

Again, nails don't bother me when they show.  
I would rather use nails than have my piece to fall apart.

With that said, you can simply glue and clamp, if you wish. 


I painted the pieces with DecoArt Americana Chalky Finish Paint in Cherish (the orange-ish color), Bestow (light green) and rejuvenate (yellow)


I took the 3 middle pieces and a White Charcoal pencil
 and free-handed my word of choice.


I painted the word with Chalky Finish in Honor.
All of my primitive painting friends, 
THIS is the color I think you will be excited to add to your stash!
It is a dark Navy--almost black and oh, so yummy!


I sanded it.
I Added some birds and branches using 
the Americana Feathered friends Stencil.

I Added the White Creme Wax--
oh, my, this is WONDERFUL stuff to give 
your project that easy white wash look.

It was too white for my taste, but no problem, 
I took the Clear Wax and rubbed it on top 
of the White Wash and it removed some of it!!


From Top to Bottom: Bestow, Cherish, Clear Wax, 
White Creme Wax, Honor, Rejuvenate, 
Ultra-fine Writer Tip on top of Titanium White Americana Acrylic.


Charcoal wanted to see the new colors I got, too.
Oopsie...there goes a bottle rolling...


Momma won't notice if I lie on top of the paint, 
but that bottle that rolled!  Ugh, what to do?!


I put a thin line around the pumpkin with that 
awesome Ultra-fine writer.
I can't wait to try it on top of Lamp Black to 
outline some of my designs!

The top cleaned easily!


This is the back of the piece painted with Cherish.
I LOVE the white washed surface.


This can either hang or it would be great to sit on top of the table with some other fall items around it.


I hope I have inspired you to try the new colors!
Many are available at Michaels, but you can also 
order from the DecoArt Store by clicking here.


Thank You, DecoArt.
I hope you like what I do with your products.
I am simply blessed to create~charlotte♡


Thursday, August 25, 2016

Tutorial Thursday: Fall Tea Kettle

I got an order for a Fall Teapot, so I will share 
some of the steps of how I created it.

When doing a special order, I try to find as much information
 as I can from the customer.

I discovered her kitchen is Navy/Burgundy.

One of my favorite things about Fall is the warm, rich colors.

I decided that I would make the background a warm tan.

I chose DecoArt's Chalky Finish in Heirloom.

I love to use Chalky Finish as a base for many of my designs.

Painting a teapot meant that I would need to choose 
a paint or a medium that was for a slick surface.

I could have chosen several different methods, 
but the most popular are:
1. Use DecoArt Paint Adhesion--this is my favorite method for most slick surfaces.
2.  Spray the object with Flat Spray Paint or with a Primer.


3.  Use Chalky Finish Paint--SO easy. 
 No preparation except to clean the object and paint!


American Acrylics work perfectly with the Chalky Finish Paint.  
These are the colors I used on this project.


I cleaned the teapot and added 3 coats of DecoArt's Chalky Finish. 
Just make certain it is dried well before adding another coat.


I added Checks of Deep Midnight Blue  and Deep Burgundy.  I didn't worry that they were even, because I was going for a slightly primitive style, since it was to have a crow on it to match her decor.


As decorative artists, we sometimes get stuck in the way we do things.  I REALLY did not want to shade/highlight every single check, so I decided to do what I call a MESSY LINE on the top of the checks and then I added some more messy lines to the Deep Burgundy checks.
Again, instead of highlighting, I used the Heirloom and added criss-crossed lines to the Deep Midnight Blue checks...PERFECT for what I was aiming to do!


As I said, my customer wanted crows.  I took one of my patterns and added a scarf to it, because she also liked that look, 
and placed them on top of pumpkins.


I thought the design needed something else for color and to cover more space, so I added a sunflower to each end.


I was much happier with that!


I stenciled Deep Burgundy all over the teapot using dry wall tape and 
added a vine at the top.

I also splattered the entire pot with Lamp Black 
to add to the primitive look.


I painted a round disc like a pumpkin and wrote Happy Fall--whew it was hard not to put Y'all on it, cause I am a true Southerner! 

I also tied some cloth around the tea spout to cover that hump that was left when I removed the ugly plastic piece...I wish teapot makers would design ALL teapots for us to paint when they weren't used~~HA HA HA


This is the finished teapot


A look from the Top


And another angle...


Here is a free line drawing for you to use on a teapot or a sign or a...
Simply right click to save it to your computer and print it...
Resize as you wish...
Use part of the design or all of it
...it is ok!

IF you do not know how to save this, simply send me an email at
romaland2.1@juno.com
and PLEASE put the subject as: Free
so I won't delete your email!

Thanks for stopping by!

I am simply blessed to create~~charlotte

IF you would like the crow pattern,
 you may purchase it in my etsy shop.