


I have always been one of THOSE PEOPLE who doesn't mind helping someone else develop their skills and I am pretty good about sharing HOW to do things...NOW, don't get me wrong, IF someone is trying to destroy my business or taking my ideas and claiming them as their own or are not willing to put in the time to learn, that is different, but MOST people are not that selfish, or at least I CHOOSE to believe they are not.
I was once told that I was a good painting teacher because I have a way to BREAK DOWN the end product into simple steps. I was flattered. I BELIEVE that WHEN someone wants to learn something, then they can...MAYBE they won't be AS GOOD as some, but they WILL be better than others! I ALSO BELIEVE that we have to PRACTICE if we want to get better...learn new techniques, try new color combinations, try new styles...it is just part of growing.
I've had a few discussions lately with my designing friends about patterns...Doing a pattern WELL is different from doing a PATTERN...
I had to re-do a snowman for an OUTSIDE project I had done a few years ago, so I thought I would show how EASY it can be to come up with a project that you can SUCCESSFULLY complete.
I used Outdoor Grade Plywood...this is about 1/4 inch...BE CAREFUL about the thickness you are choosing because plywood tends to warp...IF it is going to be FLAT against something, that isn't too big of a deal, but this LITTLE snowman...he's about 20 inches wide and 23 inches tall...WARPED as soon as he was cut out! grrrrr...but after getting him painted, he seems to have flattened out again.
You can purchase various sizes of plywood at the box stores, BUT if you need it, they will give you 2 free cuts to get it to a more manageable size...it is more expensive to buy the smaller pieces, but sometimes it is worth the money not to have to find a place to store the extra wood. I started with a piece of plywood that was 2 feet square.
I grabbed a plate and a piece of chalk to draw the head...I would say that I left about 7 inches from the top and about 4 inches from the right side since I KNEW his left arm would be waving and take more room.
Chalk is a WONDERFUL way to draw patterns because you can just use a damp cloth to erase the lines if you don't like them!

I added the body...just thought about a ROUND circle and added the arm....
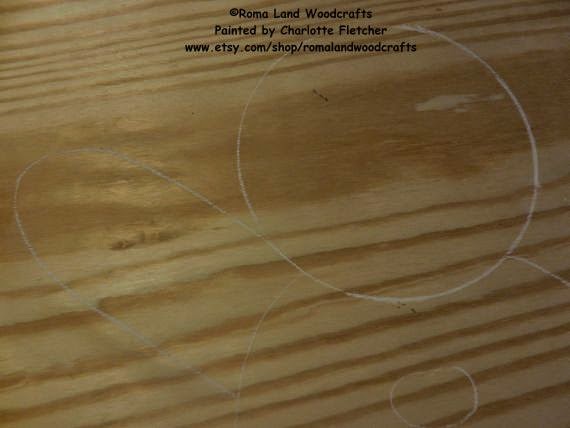
I drew the TOP part of his hat next and then added the type of hat brim that I wanted...NO, it doesn't have to be perfect...it is YOUR world and YOU make the rules!!

I am NOT a tool snob...BUY the BEST of what you can afford...do NOT go out and buy EXPENSIVE tools if you are not CERTAIN you will be using them! It is amazing the things one can do with just a jig saw...When Daddy died, this was ALL I had and I could cut out some pretty awesome things with it...JUST BE careful...keep your fingers away from the blade UNTIL it stops...don't mess with it when it is plugged in!
This is so simple to use...just use it as you use a pair of scissors...follow your lines and do NOT force the blade to turn or it will jump and you WILL get injured...USE YOUR BRAIN!...it is that simple.

You can see that I allowed the blade to cut ONLY what was basically a straight line...I could follow the curves and when I got to the point of where the design met, I would back the saw out and continue on in a straight line. When I got all of the design cut doing this, THEN I came back with my saw going in the OTHER direction from my original cut and did the same thing to get those little nicks cut...it is so simple...just do NOT force your blade to TURN where it won't turn.
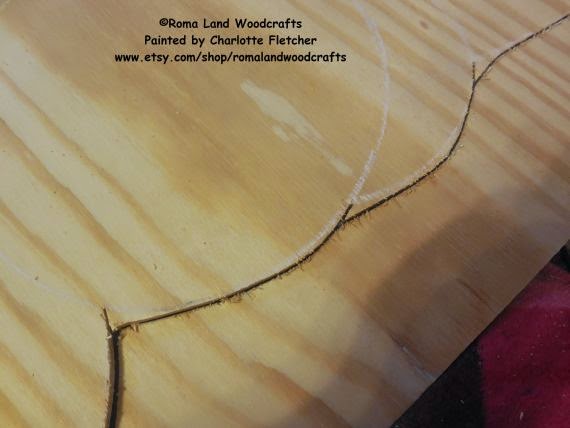 Plywood chips easily when you cut it...I chose a SCROLL blade to go into the jigsaw...it has more teeth and therefore, cuts smoother...the less teeth on a blade, the faster it will cut, but it will CHEW up your wood...Since this was something that did NOT need to be of the BEST quality, I didn't mind a few chips here and there...
A SANDER is your BEST FRIEND when cutting wood...it can smooth out the imperfections of cutting and smooth out those nicks... I use a hand sander for most of my sanding....I sand the edges first and then the front, the back and the front again...I wipe the dust off as soon as I finish.

You can use most any kind of paint that you wish...IF painting something to go outside, you can use house paint, but I just used my beloved DecoArt Americana Paints and will seal it with 3 coats of outdoor varnish...
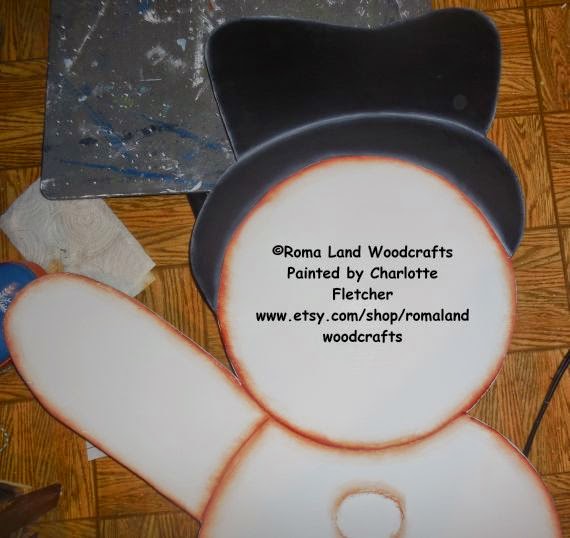
Since this is a bigger piece, I put a BLOB of white paint directly onto the wood...BE careful IF you do this because you have to work quickly so that it doesn't dry on the piece as you are painting...IF you are new to painting, I would STRONGLY suggest that you pour the paint onto a pallet instead of the wood...you know...DO as I SAY, NOT as I DO...ROFL!!

I painted the front, the back and then 2 more coats on the front...ALWAYS paint the BACKS of your projects...ugh...

To mark your face, simply use the plate again...

The hat is painted Black...

I used Traditional Burnt Sienna to FLOAT SHADE the outline of the WHITE Part of the snowman...There is a LOT of debate as to WHAT COLOR to float snowmen...I have seen one lady post REPEATEDLY that ALL snowmen should ALWAYS be floated with BLUE and on and on...OK...she HAS the RIGHT to do that...ME? I float ANY COLOR I WISH! I chose a BROWN this time because it is a primitive type design...sometimes I use BLACK...sometimes I use BLUE, but NEVER do I ALWAYS do ANYTHING...ROFL... REMEMBER that PAINTING should be FUN and should be a reflection of YOU and what YOU like!!

I float shaded the hat with White...OFTEN I will use a GREY, but it doesn't matter...again...YOUR Choice! Shading is something that I STRONGLY suggest that YOU SPEND time learning to do...there are TONS of videos on You Tube...AGAIN...there are TONS of different ways to do it, also...IF you can't shade yet, you can load a FLAT brush with BLACK and add some White to the corner of your brush and place the WHITE CORNER on the edge of what you are shading...it is a different look, but it is another technique that is good to learn...PRACTICE!!! Oh, and SOME people to shade will put that color on their FINGER and just drag it along the edge...HEY, do what you gotta do!!
I used a large stencil brush to add the cheeks...use VERY little paint and a VERY light touch to SWIRL on the cheeks...IF you don't have a stencil brush, then you can use a rag...I just like this look and think that snowmen need big bright cheeks cause they are cold...

Add the eyes, mouth, and buttons...you REALLY do need a GOOD brush to get GOOD lines...

To make the nose, I always start with a C and then add the lines to form a CARROT...C is for CARROT...LOL...
 I added the details to the eyes and that was it...SO simple!!
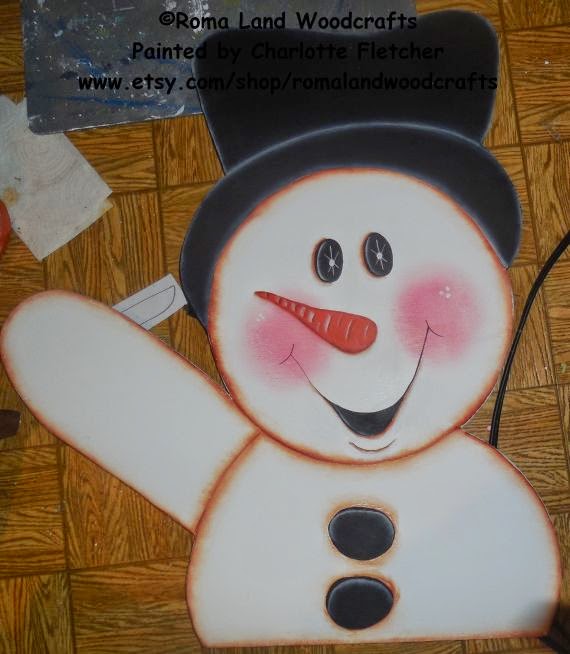
I will use wire to attach this snowman to the star...The star we are using was made from old tobacco sticks, but you can find SEVERAL ways to make them on pinterest!
I hope this will inspire you to TRY making something for YOU to use...WHEN you break down large shapes into SMALLER shapes, it really is not difficult...I've had so many people tell me that they CAN'T paint because they can't DRAW a STRAIGHT LINE...WELL, neither can I, but I SURE can use a ruler and VERY SELDOM do I have need of a STRAIGHT Line, so on to the NEXT excuse... ;)
I send you WARM WISHES on this COLD DAY in Middle Tennessee...Blessings to YOU...~charlotte
He is CUTE! I love him! Great tutorial, Charlotte! Have a wonderful weekend! :)
ReplyDeleteGreat instructions & and adorable snowman!!!
ReplyDelete