About Me

My photo
I LOVE to design and to paint whimsical items that will put a smile on your face. Each day I share my simple life with you as I try to encourage, to inspire and sometimes JUST to make you smile as I recount my life growing up on a dairy farm! I've never had many material items in my life, BUT I have been blessed beyond words with love and encouragement from WONDERFUL Parents who instilled in me WHAT was important. I have had EVERYTHING that I needed and WAY too much of what I wanted. I am slowly learning to be a better person each day through my interactions with my friends on Facebook. Some day I hope to be as good as people seem to THINK I am! I am BLESSED! Welcome to my little corner of the world...Please stop by and visit often!
Showing posts with label free painting project. Show all posts

Thursday, June 9, 2016

Tutorial Thursday


You all will be happy to know that I am feeding the mosquitoes very well…heavy sigh…


I have spent over an hour going to every spot in the back yard and in the living room looking for a place to get a good picture…good grief!  Some days it is so easy, and then there are those days that all you do is struggle…today has been the struggle, but it is ok.  I learn by doing, and I should be brilliant by now, but sadly~~not so much!  teehheheeee


Karalee was looking for the pattern I am sharing today, and I told her that I would be more than happy to share how I made this.


OF COURSE, I used my favorite DecoArt Products. 


Honestly, that is all I use if they are available.  I cleaned out every other brand and gave them to Goodwill.  I hope some person was able to grab them and use them to create…


SO, I gathered:

Americana Decou-page Satin

Americana Acrylics:  Black, Foliage Green, Avocado, Raw Sienna, and White

Scissors

Very Old Hymnal—I always make copies.  I just can’t make myself use real music.

A brush---about ½ or #12

A good liner brush.

Magnet or Wire—I made these into magnets

Word Processing Program~~Brandly Hand, or font of your choice.  The font size I used was 36.

Tracing Paper


A friend had asked me to make something using this song to give to her Sunday School Class for Christmas of 2014.  After Several tries, this is what we agreed to do.  I love how it turned out!


I purchase the wood in packages of 6 from Joann’s.  This is the only place I have ever found these.


Paint the wood with two coats of Foliage Green.


Take the piece of music and fold it in half (the half mark should be above the word TUNE).  Do not make a heavy crease, just hold it in half.  Cut in the shape of a heart.


Apply one coat of Decou-page to the wooden surface and place the heart as you want it to be.  I applied mine to be off-center.  Apply another coat of Decou-page on top of the heart, getting out as many air bubbles as you can.  I didn’t have problems with air bubbles on this project.


Clean your brush with soap and water.


Allow the piece to dry.  Of course, impatient me, used a hair dryer to speed things along!


I drug the corner of my brush through Raw Sienna and applied it to inside of the heart.  When I finished, I wiped my brush on the green part of the wood to “clean out my brush”.


I then drug the corner through Avocado and applied this to the outside of the heart and around the edges.  Again, I wiped my brush on the green part of the wood to “clean out my brush”.


I applied a little bit of White in a few spots, but not much.


After I finished, I decided the heart was too light, so I thinned Raw Sienna and painted it over the heart to “antique” it.


I traced the writing onto the piece and outlined it with thinned Lamp Black.


When all was completely dry, I painted over the entire piece with one more coat of Decou-page to seal the piece…


That is it!!  Put a magnet on the back and give it away to someone special!


I love these simple projects and hope you will, too!  Let me see if you create something using this idea!!


Every once in a while, we all need a fine tuning! 
When my heart starts to wander, I am thankful that I need only ASK to have God bind it to His heart, so that I can focus on the things that matter...


I am simply blessed to create…~charlotte♡


Friday, January 1, 2016

Bloom and PAINT in 2016

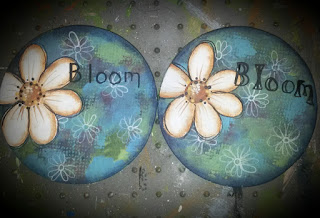
I am pretty sure that most people know by now that my word for 2016 is BLOOM.
I  never realize how many people I talk to regularly, until I start to do something like this!  

A few months ago, I started playing with the Mixed Media line that DecoArt introduced a bit ago. I LOVE the colors and techniques I am learning.

I am certain I will never leave my "traditional" painting, but I thought I would try to use the techniques together. 

I painted this small 4 inch square canvas during my learning process and thought that I wanted to keep it.

As I was thinking about my WORD of inspiration for 2016, I looked at the canvas and knew this would be my word--BLOOM.

The crazy idea of painting ornaments happened by accident, and painting 56 in a week was cra-cra and I thought sure I was a "blooming idiot"! I could use at least 50 more! 

But, it has blessed me in ways I never thought. I didn't do it to gain glory, but I really wanted to encourage some close friends to BLOOM! We all have our moments of needing a gentle push sometimes.

SO...here is how YOU can paint this.
Blogger won't load my pictures from the computer, so I had to re-do them...heavy sigh...

Gather your DecoArt Americana paints:
Lamp Black
Snow White
Antique Maroon
Deep Midnight Blue
Avocado
Fresh Foliage
Turquoise Blue
Raw Sienna
Dark Chocolate
Marigold
Ice Crystal Glamour Dust
Gesso
Duraclear Satin Varnish

Base the surface (front and back) with 2 coats of Fresh Foliage
Put the following colors on your pallet:
Fresh foliage, turquoise blue, Antique Maroon, Deep Midnight Blue, Avocado.

Take a small stencil brush and pounce on Avocado
Then Deep Midnight Blue
Turquoise Blue
Antique Maroon...you can pounce your colors together as much as you like...
Take a piece of plastic mesh (used for screen windows) and scrub Fresh Foliage and Turquoise Blue on top...the texture is lovely!
This, to me, is what gives the ornaments much of their beauty.
Shade around the outside with Deep Midnight  Blue. Thin Snow White and add 5 or 6 flowers using a 10/0 liner.
With Gesso (or just white paint, but the gesso gives more texture), draw the center of your flower close to the left edge and add petals--I used a #4 round. When the gesso dries, paint with Snow White.
Shade around the petals with Raw Sienna
Paint the center with 2 coats of Raw sienna. Thin this and add lines on each petal. Shade the left side of the center with Dark Chocolate. Gently dry brush Marigold on the left of the center followed by a tad of Snow white. Outline each petal with thinned Lamp Black using your 10/0 liner. Add dots of Lamp Black and Margold to the center with your stylus.
The lettering is simple. Use the 10/0 liner and write BLOOM. Go back to each letter and add "triangles" to the ends and make one side bigger on your rounded letters...see the picture...color in these triangles/circles. I added a thin line of Snow White to the letters as a highlight.
Shade around the flower with Deep Midnight Blue.

Paint 2 coats of Ice Crystal Glamour Dust on the backs and finish with 2 coats of DuraClear Varnish on the front and back. I will be adding Magnets to these...NOW...who will get the next 2?
I hope that you ALL will live 2016 in FULL BLOOM, but just take each day, one step at a time and do the best you can! If you paint one, let me see it!
I  wish BLESSINGS to you in 2016...~~charlotte♡