

I am a self-taught painter and I have painted LOTS of different things trying to find my niche and learning new techniques.
I painted a few years before I learned the technique of floating. I had grown to love the "dirty brush" method (figures, huh) to get my highlights and shadows. I am glad that I did that because it taught me about PAINT!
My friend, Lynn, of Painting Thyme Needfuls, was painting a piece by Rebecca Trimble, so I was inspired.
 |
| This was the first step...looks just like the finished product, huh?! LOL |
I dug through the 2 books I had and changed my mind about
10 times as to THE ONE that I wanted to paint....
 |
| Next came washes to establish the land and the sea... |
I FINALLY decided that I would paint a Pattern Packet called, PORTER'S LIGHTHOUSE.
 |
| Yes, I went a BIT CRAZY with the clouds, but they are so fun to paint! |
The pattern was for an 11x14 picture,
but I only had a 12x16 canvas, so that is what I used...
it seemed to fit perfectly...
SOMETIMES I THINK we get hung up on making certain
we have the EXACT colors and surfaces for a painting...
ME? I do the best I can!!
 |
| I did NOT have Spicy Mustard or Autumn Red, so I used my favorite colors of TUSCAN RED and MARIGOLD. |
I am not a great fan of painting STRAIGHT lines...
I paint mostly frogs, daisies, and ladybugs and
EVERYTHING has a smile on its face...
 |
| I added tape to paint on the bushes to keep the bottoms straight... |
I LOVED the red house in this design and the colorful bushes
just added that extra HAPPY COLOR that I love to paint!
 |
| I added some shading to PLANT the designs into the ground... |
As painters, we seem to see WHAT we don't like as
opposed to what we DO like...
WHY is that?
 |
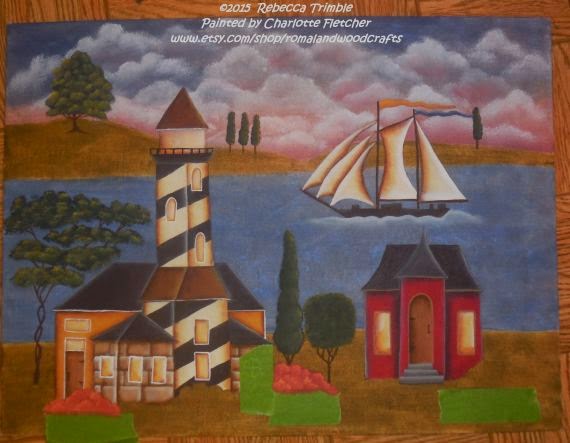
| This is the finished design. |
As I finished the painting,
I KNEW that mine looked little
like the original...
I am CERTAIN my washes were too heavy, but you know what?
I LOVE IT!!
....hmmmmm....as I look at the original, I see that I did not put a shaded line down the middle of the lighthouse...
I can EASILY fix that!...LOL
 | ||
| This is the Original picture from the pattern packet. |
As one who designs, my goal is to give a GUIDELINE for someone...I don't want carbon-copies...I WANT people to put THEIR styles into what they paint
If you are interested in purchasing Rebecca's patterns, and WHY would you NOT...
CLICK HERE to go to Rebecca's website.
I can honestly say, that I had FUN stepping out of my
COMFORT ZONE to paint this beauty!
* * * * * * * * * * * * * * *
As I said, I got WAY TOO CARRIED AWAY with painting the clouds, but a friend asked me if they were hard to paint...With me being me, of course, I did not follow the directions in the packet...I did them the way I had done them before...
bad me...BAD BAD ME!
GLORY NO!! They are so easy, so I have included step-by-step picture below to show you in case you want to paint some this way...I have fun finding NEW WAYS to do this and when I got my MOP BRUSHES, this seemed like a good use for them...
OF COURSE, I used DecoArt Americana PAINTS, as I always do...I THINK they are the best for MY paintings!
 |
| I painted the sky with UNIFORM BLUE AND KHAKI TAN using a slip-slap motion...don't have a solid covering. |
 |
| When Dry, add a wash of clean water |
 |
| Add the SHAPE of your Cloud with a deerfoot Brush...you can use an old scruffy brush, also... |
 |
| Using the MOP brush, gently tap, starting at the bottom and working to the top, softening the color. I didn't like the first one, so I just added some more paint... |
 |
| This is what it looks like after I MOPPED it... |
 |
| I added more White paint for another cloud...Only work on 2 or 3 clouds at a time because the paint will dry and you will not get the softened look that is the goal! |
 |
| This is after they have been mopped...you can add some COLORS in here using the same method, if you wish, OR add a VERY LIGHT WASH of another color to the bottom of the clouds, but that is the method!! |
People remind me of painting...SO MANY LAYERS...What you start with is not always what you THINK it will be...we NEED a FOUNDATION to make us STRONG...
Some People are worth peeling back the layers to FIND what makes them WHO they are...
I am THANKFUL for all of my friends who take the time to get to know me...I HOPE that it has been worth the effort...
Here's hoping that you will enjoy this DAY that was created JUST for us and that you will USE the talents you have been gifted...
As always, I WISH...Blessings to YOU...~charlotte
So beautiful Charlotte... Love it... thank you for the info on doing the clouds... think I might have a mop brush somewhere... lol.. Have a wonderful day!! xx
ReplyDeleteSo love this Charlotte! And thanks for the education!
ReplyDeleteYou did a fabuous job on this piece Charlotte! Your clouds are wonderful!
ReplyDeleteGreat job
ReplyDelete