About Me

My photo
I LOVE to design and to paint whimsical items that will put a smile on your face. Each day I share my simple life with you as I try to encourage, to inspire and sometimes JUST to make you smile as I recount my life growing up on a dairy farm! I've never had many material items in my life, BUT I have been blessed beyond words with love and encouragement from WONDERFUL Parents who instilled in me WHAT was important. I have had EVERYTHING that I needed and WAY too much of what I wanted. I am slowly learning to be a better person each day through my interactions with my friends on Facebook. Some day I hope to be as good as people seem to THINK I am! I am BLESSED! Welcome to my little corner of the world...Please stop by and visit often!

Thursday, September 15, 2016

Tutorial Thursday: Witch Ornament

One of my favorite things about social media is finding some amazing artists.  I love those who share techniques and tips--that is the kind of person that I like and want to be like.

I also tend to gravitate toward those that are Christ Followers.  The same was true when I would buy books.  I read the acknowledgement to see what kind of person they were.

One of my favorite people to "follow" lately, is Mindy Lacefield.  Her style is so far from mine, that it intrigues me.  A fb friend has been taking her 24 faces on-line workshop, and I find myself turning a bit green for not having money and being able to take classes, BUT then, I again, am amazed at the generosity of so many artist who freely give of their time to share.  Be sure to let people know how you appreciate them when they share.

Mindy shared how she created an ornament the other day on her blog click here to go there.
I wanted to try it, so eventually, on a trip to the kitchen, I looked to see if I had any coffee filters.  

NOW, this is where we laugh.  I DID find some, and they were greatly discolored.  I tried to figure how long they had been in the cabinet, and I KNOW that coffee has not been made in this house for 14 years, and since they last so long, they probably had been there for about 6 or more years, since we only made coffee on Christmas morning, and maybe 2 more times...so, my question is: Does this make my ornament VINTAGE?  ROFL

I also, have had these ornaments for about 6 years too!  So I gathered them with the naturally stained coffee filters...


I used DecoArt Americana Decou-Page Matte.
I removed the tops of the ornaments.


I covered the ornament with the product and added
 pieces of  the torn coffee filter to the ornament.


I didn't care that the pieces were smooth or not-I wanted them to add texture.  I kept adding until I had covered the entire ornament.
I covered the top of the coffee filter with a generous 
coat of the Decou-Page.


Oh, and then, the fun part is getting to peel 
the "glue" from my fingers.  
Yes, I hope to always keep part of the kid at heart inside of me!!

I placed the ornaments on dowels to dry.
I had time to give my baby a Peanut Butter/Jelly sandwich.

This is the dried ornament.


I painted it with white Gesso.


Then with Jack-o-lantern.
I used my favorite "tool", Dry Wall Tape as a stencil 
to add texture with Marigold and White.


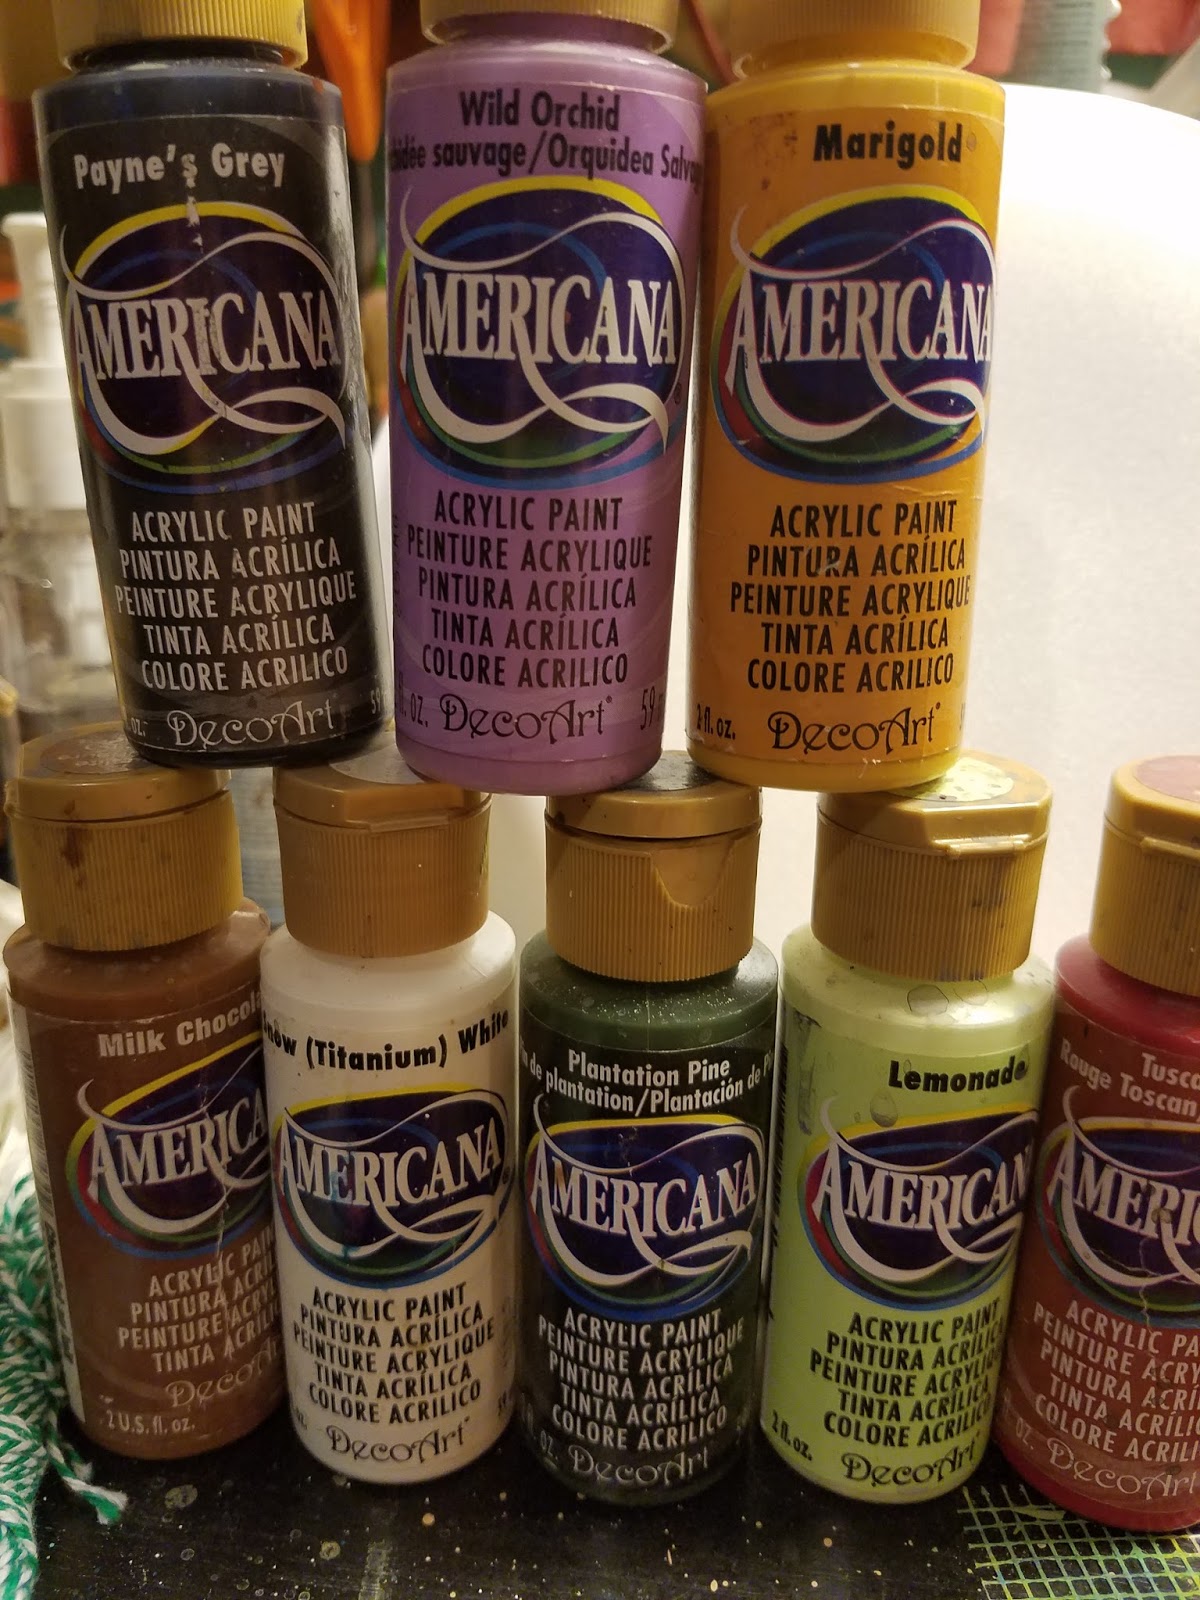
These are the colors I used to paint my ornament.


After I finished painting, I added some of Neons Fiery Red and Metallic Lustre in Orange Flicker.  I will brush several coats of Glamour Dust on the ornaments later--it messes up pictures...

How fun is this?

I don't do scary Halloween.
I try to keep everything I paint as Happy!


I hope this will inspire you to use those 
glass ornaments in a different way...
adding just a bit of texture can make a big difference!


Thanks for stopping by my corner of the world!
I am simply blessed to create~~charlotte♡


Tuesday, September 13, 2016

Technique Tuesday: DecoArt Americana Chalky Finish

I cut out some wood yesterday and I saw this little creamer I had bought in the past for 49 cents, so I gathered it with my wood and carried it to my painting table--what is one more thing in my pile, right?

I had decided that I was going to use Chalky Finish Paint to paint the scarecrows I was making, so I quickly cleaned the little creamer and also grabbed a baby food jar, that--surprise, surprise--was also sitting on my painting table!  LOL

I thought this would be a good test to show you WHY I love DecoArt Chalky Finish paints.


New Life is one of my favorite colors.

These are the colors that I used to paint my little projects.


All I did was clean the items.


This is the first coat--don't lose hope--it will be ok.
Be sure to allow the paint to dry completely 
before adding another coat.

*IF your chalky finish has become too thick, simply add water.  I dip my brush in water and that usually makes it flow off my brush.

*No, you simply start painting--you don't have to prep the surface, except for making certain it is free from dirt/oils.


I think I added 3, maybe 4 coats of paint to the project.  
It dries so quickly, that it is easy to lose count.

This shows the first coat to the top of the baby food jar--
no problem painting on metal, either!


This shows the second coat applied--pretty amazing, huh!


See how smooth this is!  
Yes, sometimes the brush strokes show when painting, 
but you can prevent this by thinning the paint more...
Personally, I like just a bit of the texture it creates.


I decided after I got the baby food jar painted, 
that I wanted to make an ornament.  
I drilled a hole in the top.
I Gathered a piece of ripped homespun material for a hanger.
I found a stylus to use to push the material through the hole.


I used needle nose pliers to pull the material through 
and tied a note in it.


I free-handed the message with a White Charcoal pencil and painted over it with Titanium White Americana Acrylics. 
When the paint dries thoroughly, I take a clean flat brush, and wet the surface and it removes the White Charcoal pencil...
just carefully wipe it dry.

*Yes, of course you can use DecoArt Americana Acrylics 
on top of The Chalky Finish Paint!  
DecoArt Chalky Finish Paint is one of my favorite ways 
to create a background!


I drew a branch and added some pine needles and berries.
I flecked Titanium White onto the entire surface, 
placed the top back on and WOW!!
Isn't it adorable??!!


I found a saying that I liked and wrote it across the top of the creamer...
Added flowers...
Sealed it with DuraClear Soft Touch Varnish.


Of course, I wouldn't leave you hanging without 
giving you a little pattern.  LOL
I do, however, wonder if anybody has ever used 
one that I have given to you!  =)


Oh, well, we will pretend that they make you 
happy to get them, and leave it at that!!

I wish you a wonderful week and 
I hope you get to create SOMETHING.

I am simply blessed to create~~charlotte♡


Thursday, September 8, 2016

Tutorial Thursday: Dazzling Metallics White Pearl

I had a special order for a customer, whom I consider a friend.  She sent a picture of what she wanted, and I knew I had a pattern by Sandra Brake that would work, so I got to work.  I was getting ready to put my little swigglies on this, so I pulled out my grey when all of a sudden, I saw the bottle of DecoArt Dazzling Metallics Paint in White Pearl sitting on the corner of the table, and thought I would give it a shot.  The final picture doesn't show it so much, but there are a couple that show it--IT is so much better than GREY!  I am SO EXCITED to learn this little trick and I had to share it with you!

I put it on the red hat, also...


My mind immediately went to other uses for this 
Dazzling Metallics White Pearl.  My first thought was 
how it would look on a white pumpkin!

I found this neat piece of wood that was full of textures...I am sure it broke when a nail hit it, and that is one reason I loved it...it is perfectly lop-sided!  I know, it will drive some people crazy, but not me!


ALL of the products I am using are by DecoArt
I am using DecoArt Americana Acrylics

I knew I wanted it to have a teal colored background, 
so I chose Bahama Blue. 
Teal Green was the color I chose for what would be the crackles, 
but I am jumping ahead...
There are dozens of pumpkin painting tutorials on Pinterest, so I am not going into a lot of detail.

The background is what I really love about this!

Once I painted the surface with Bahama Blue, I used a piece of dry wall tape to stencil Burnt Sienna.  
I then picked up some Light Buttermilk to add some color variations--remember to use colors of your painting in your background to draw the eye OUT to see your background. 
I added more texture with Bubble Wrap and Light Buttermilk.


I sanded this before I started the Pumpkin...


I drew my pumpkin onto the surface with a White Charcoal Pencil.
I added the stem first with a coat of Burnt Sienna.
On each section, I added Teal Green on the 
top (or left) of each section, 
Burnt Sienna on the bottom (or right) of each section and
Filled the middle of each section with Light Buttermilk.
Use a dirty brush--meaning, don't rinse your brush.  Allow all of the colors to mix on the surface.


I went back and added more Light Buttermilk to the sections, 
and added more shading if I thought it needed it.
 I brushed another coat of Burnt Sienna onto the stem and 
added Light Buttermilk on the bottom side.
I added Burnt Sienna underneath the pumpkin to ground
 the pumpkin into the picture, instead of floating in mid-air.


THEN the moment I had waited to see--
I added the Dazzling Metallics White Pearl!!


I added some brown lines around the stem on the pumpkin 
to give it more texture.


Next, One Step Crackle was added all around the pumpkin.  
I put it on rather thick in some places.
When dry, I brushed thinned Teal Green over the background, 
and wiped it back. 
I decided I wanted it darker, so out came my favorite Payne's Grey.
It was just want I wanted.


I shaded around the outside of the Pumpkin with the Payne's Grey, 
and also shaded the right and bottom of the stem.


These are the DecoArt Products that I used


I will probably add a WORD to the piece in Light Buttermilk.

Here is the pattern if you need it.
Here is the Pumpkin Pattern if you need it to create your own pumpkin.  The original size is 4.75 x 5.5--who knows what size it will save as!!


I am so happy to share this with you and 
hope it will inspire you to create.

ALWAYS, ALWAYS, SUPPORT your fellow artists.  
Remember how it feels to be criticized, 
and NEVER do that to someone else.
We all have our own likes and dislikes, 
so if you don't like something, just keep scrolling on by! 


I am simply Blessed to create~~charlotte♡


Sunday, September 4, 2016

Serendipity Sunday: Thankful for the Laborers


It has been over a week, and I am still thinking that I have had my fill of seeing butt cheeks, crack indentions, spandex, and fit people for another four years...


Yep, I enjoy watching the Olympics and rooting for the underdogs, hearing inspiring stories, and feeling the pride as the American Anthem is played.  I am a PROUD American! 


I STAND to show respect for her citizens, and no, I have NEVER been taught to place my hand over my heart when the anthem is played, so get over THAT, but I have been taught to stand, remove my hat, keep my mouth SHUT, and reflect on my life that I am so blessed to have.


We are not perfect, because we are made of a country of imperfect people, but I STILL feel proud.


As we pause for a moment on this long weekend to remember the LABORERS, I want to give a Shout Out of Thanks to every single person that works to keep the wheels turning.


We sure do complain when we don’t get good service, or service that we THINK we deserve, but I am too afraid to think of what would happen if You or I were in charge, because, I read your posts…


It takes ALL of us, working together and doing the best we can.


We MUST allow others the same respect.  Sure, it would be nice if everyone had the same work ethics or abilities, but we don’t. 


We MUST allow others to do the best they can.  Making rude remarks, clearing our throats, humming and hawing does NOTHING to improve a situation and it makes US look like the fool!


BE KIND…BE PATIENT…BE ENCOURING…HELP…Speak words of kindness…slow down…think about how YOU want to be treated…realize that it PROBABLY is not all about YOU, that there are other people in the world, and you are only ONE small piece of a HUGE puzzle.


I was raised by a Father who worked 52 weeks a year, 7 days a week, but NEVER did I hear him complain.  He taught me that when things broke, then it was just “payment coming due” for the time that it worked without fault.  Oh, how I am trying to remember that, my sweet Daddy.


My parents never complained about the money we needed.  They did whatever they could to ensure that we had every opportunity available to us, and did what they could to make sure we got to participate.  Daddy joked that when we were young, he couldn’t keep change in his pocket, but as we got older, his pocket was filled with change, but his billfold was empty!  I laughed as he would jokingly put out his hand for “change” when he sent me to purchase something, and how I would do the same to him, when I asked him to get something for me.  So much fun we had!!  Not only did they NOT complain, but gave thanks for what we had, and shared whenever it was asked, or needed.


I am thankful that I had parents who didn’t complain about people, about how we were being mistreated, or got poor service, or talked about people or teachers, or constantly shared about their every ache and pain, their having to wait for us to finish a task or event…I am THANKFUL that social media was not in my childhood, because I would have missed out on friendships and gathering at the homes of family friends. 


I am thankful for the work ethics I was taught…that ANY job worth doing was worth doing well…that I was not expected to be PAID for every act of kindness I did…that doing for others was important and expected, for those with much are expected to give more…that there is no way to out give God…that I am expected to use my talents for the community and for others…that I am to say PLEASE and THANK YOU and to really care about others…that it is NOT all about me…that I am to share…to live by the Golden Rule…that God will ALWAYS provide and will ALWAYS KEEP His promises…that GOD is the center of all and the head of my life…


I am grateful that I was PUSHED and yes, MADE to do things that I didn’t want to do.  I learned that sometimes, we must do things we don’t want to do.  I learned that I was able to do more than I thought I could.  I learned that I don’t like doing some things, but that I DID like doing other things.


I am Thankful that I was taught that no one is beneath me.  Yes there are people who do not value the things I do, but NOBODY is inferior to me.  ANYONE who works an honest job for honest pay is to be valued.


I am thankful that I was taught that MONEY was not the only reason for me to work.  When I accepted my first job in 1984 for $10,000 plus housing, I complained to my Daddy as I was trying to decide what to do.  He looked at me and said, “I wish I could be guaranteed $10,000 every year.”  I was ashamed. NEVER did I ever complain about the money I made, and YES, I think I was over-paid for some of the jobs I did.  Thank you, Daddy for showing me by example.


Father God, my prayer, today, is one of gratitude.  I am blessed with gifts beyond monetary value.  I am thankful and humbled.  I pray for those who work with physical and emotional pain, and I pray for health for them.  I pray for those who struggle, even though they are doing the best they can.  I pray for those who are selfish, that their hearts will be touched to find importance in things that really matter. I pray for those searching for employment~~send them WHERE they belong as a part of Your Plan.  I pray that I will always feel compelled to go the extra mile, as a reflection of YOU and of your love for me.  Thank You, God, for your loving watchcare over me.  Bless all of my internet friends and make their homes safe and beautiful harbors of Your Grace…It is in the name of Jesus Christ, Your Son and My Lord and Saviour, that I pray, Amen.


I am simply blessed to create~~charlotte