About Me

My photo
I LOVE to design and to paint whimsical items that will put a smile on your face. Each day I share my simple life with you as I try to encourage, to inspire and sometimes JUST to make you smile as I recount my life growing up on a dairy farm! I've never had many material items in my life, BUT I have been blessed beyond words with love and encouragement from WONDERFUL Parents who instilled in me WHAT was important. I have had EVERYTHING that I needed and WAY too much of what I wanted. I am slowly learning to be a better person each day through my interactions with my friends on Facebook. Some day I hope to be as good as people seem to THINK I am! I am BLESSED! Welcome to my little corner of the world...Please stop by and visit often!

Friday, January 26, 2018

Sprinkle Love


I was raised that when you feel down or sad, doing something for someone else will make you feel better! 

I believe this.

Thursday would have been my Mother's 86th birthday.

She and I butted heads, as most mother/daughters do, but I always knew she was a good mother.

She LOVED.
She told most everybody that she loved them--yep, even strangers.

Today, (Friday), a FB friend is flying high with the angels.

She was quirky, fun, positive, and full of encouragement and love.

My heart is broken for someone I never met.

She made a difference in my life, and I already miss her.

My prayers are for her puppies--Max and Mia, and her husband, Glen.

She was a true Renaissance woman.


Life is fleeting.

We are here to fill our chairs, only for a brief moment.

Most of us have empty chairs
in our lives. 

Live your life so that people will notice your empty chair! 

Love people.
Encourage others.
Support your friends and family. 

Leave a trail of love 
Everywhere you go!

Sparkle on, my friends.

I am simply blessed to create~charlotte♡


Note: this pattern was created as a free giveaway in www.toletown.com during Christmas.

I am blessed to be a designer on their team this year. I will be doing 4 of my FUN, FAST, and FABULOUS designs for them. Please join our town. 


Wednesday, January 24, 2018

Mixed Media Magnets

I told Christine, the other day, that mixed media tugs at my heart.

I love the layers and the textures.
I am not a fan of weird stuff, though, and I don't care for flowers and such stuck on the design.πŸ˜πŸ˜‚πŸ€£πŸ˜ƒ

What I enjoy about it, is that I feel more people can do it without fear of failure, because, really, anything goes.

I want people to feel they can create! 

I needed a quick RAK the other day, so I pulled out some circles to create a quick magnet.


I had some tissue paper left over from a previous project, so I tore it into small pieces.


Grabbing my favorite DecoArt Decoupage, and  using my finger, (I think that makes me a REAL mixed media artistπŸ˜πŸ˜‚πŸ€£πŸ˜ƒ), I smeared the glue all around and added the paper. I didn't worry that it overlapped the cicle, or that it wrinkled, I just made certain that it was glued well.


When it dried, I simply used a piece of sandpaper (a fingernail file works well, too), I gently sanded the edge, from the top down, and the excess  paper peeled off perfectly. This sure beats trying to stay inside the edges! 

I grabbed the DecoArt Gel Stain to cover the backs. I did this while the Decoupage dried.  


AND, since a piece of punchinello is most always within reach, I stenciled Red on the back. Pouncing your brush up and down, this literally, took about 5 minutes to completey Cover the backs. It is so worth it to get a finished look.


I added a few dots to the fronts. 
You know, these look pretty good just like this...add a favorite word or phrase, and it would be a great RAK.


I thought I would use my DecoArt fluid acrylics.

The top left circle has 3 colors--a turquoise, a purple and green gold. I love the transparency! See the red dots shining through!

The circle on the top right uses the exact same colors, but I added white to them. They became opaque, but you can still see through them a bit.

The middle left is the Turquoise.

The Middle right is only the purple.

The bottom is the Green Gold.


I added my favorite stencil over these to show how easily it is to add texture.
Again, you can stop here.


I decided to add a heart using my new stencil girl stencil.
Again, use very little paint in your stencil brush, punching in an up and down motion.


I love the mosaic look.


Pretty cool, huh!


I added some line work.
I added Shading with my fudeball pen.
I sprayed it with a Satin Varnish
When it dried, I added words using the Matte decoupage.


I like it!
Fun, Fast and Fabulous!

I am simply blessed to create~charlotte♡


Friday, January 19, 2018

Happy New Year!


Holy moly...this was written before Last Friday. The highest it has been has been 32, and that was yesterday!

It is so warm today, the heat kicked off and has been off most of the day! 

We have spent most of this year in the single digits at night.

I have spent most of my time sitting inches away from the heat and watching painting videos.

I have watched Laurie Speltz 12 days of Christmas videos--painting them in your head counts, right??! πŸ˜πŸ˜‚πŸ€£

AND now they say we are in for a wintry mix on Friday! 🀀

Today, as I made Veggie Soup from my leftover Sunday's roast, I was thinking of how good it was going to be with a pan of hot crunchy cornbread.

Charcoal ate 3 wedges of cornbread! He thought It was so yummy, too.

We played a little fetch outside in CELEBRATION  of the warmer day.

I was sitting on the back porch in my no drama lama pajamas without shoes, enjoying the 60s.


I giggled at how "warm" the 40s felt after the past 2 weeks. It is all perspective, after all.πŸ˜πŸ˜‚πŸ€£ 

I thought I needed to share SOMETHING with you, since it has been awhile.

I have enjoyed "piddlin'" around with mixed media. I like how it gives a creative outlet to those who haven't learned the strokes of decorative painting.

I enjoy shading with the water soluble pens and Charcoal pencils.

I really like peeling off the DecoArt Decoupage glue from my fingers. I know, I might have a bit too much of an inner child.πŸ˜‰

I found the coolest stencil from www.stencilgirls.com.

Nope, I am not compensated from them. It is just a very cool stencil.

I reinforced my knowledge that I cannot stencil with a cosmetic sponge! 😲

I just played with this until I liked it.

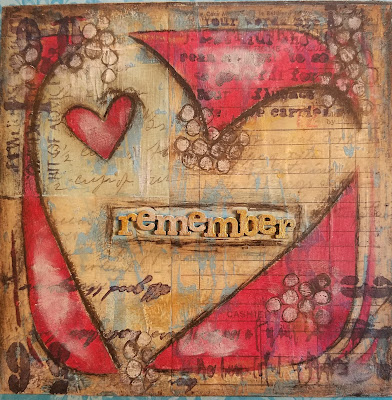
I used a 6 inch wooden canvas and painted it with Indian Turquoise.


I used copies of recipes from my Great Aunt Jenny's box of recipes. Most were written on the backs of things--it must be a family trait. 

I am sharing a pdf file of these copies.

A note about the copies: IF you have an ink jet printer, you will need to spray the copies with a matte or Satin Varnish before you apply any kind of glue (decoupage) to them. Just a couple of light mists...If you have a laser printer, they are ready to use.

I added the papers with Decoart Matte Decoupage.


I smeared some Indian Turquoise and Titanium White down the front with a palette knife, and then wiped most of it off with a babywipe, because I really wanted the background to show.

The stencil was added with Tuscan Red. I LOVE this stencil!


Using a Soft Charcoal pencil, I outlined around the stencil.


I added the word "remember" with the Decoupage. I bought that word in a package of other wood veneer cutouts at Joannas, about 3 years ago --imagine THAT! πŸ˜‰

I colored the "remember" with watered down Indian Turquoise, but it didn't show as much, so out came my container of DecoArt Metallic Lustre in Gold Rush. Mine is dried up, but adding a bit of water worked perfectly for me to smear it over the top of the word with my finger. I smeared some lightly around the canvas, too.

A helpful hint when painting is to include colors from your design in your background to help lead your eye around the painting. I figure that philosophy is true in Mixed Media, too! πŸ˜πŸ˜‚πŸ€£

I used a Black Sennelier oil pastel to outline the edges. They are so creamy!!


Payne's Grey was used to stencil some background words and numbers.


Well, of course, I had to use my punchinello to add a few Bleached Sand circles, and dry brushed areas on the red.


So, I pulled out my fudeball pen to again, outline the heart and circles. I used my finger to smear it...so cool to play with!

Since many of the things I used are water based, I  will have to spray it to set everything in place. If I add a brush on varnish, it will smear everything! 😲


This is aged perfectly for my taste. I can still see a lot of the background, and I like that.


The word "remember" is perfect, as I recall all of the baking and cooking that was done in this 100+ year old home.

It is good to REMEMBER our past, but important to live in the present.


I am so thankful for my heritage, and hope that I would make my parents proud.


I hope you will CELEBRATE your life, creatively.

I am simply blessed to create~charlotte♡