Pages

Sunday, June 28, 2015

Excuses for NOT Blogging...Sunday, June 28, 2015

I read this week that bloggers SHOULD blog at least twice a week...I agree...

I have had a HARD time getting motivated to do this because it FRUSTRATES me to no end at how long it takes me to do a post because of my SLOW dial-up internet...I find myself SCREAMING at God, BEGGING HIM to SOMEHOW make a way for me to find an AFFORDABLE solution...
Then I feel guilty for getting mad at GOD because it 
CERTAINLY is not HIS FAULT!!!

Designed by Sharon Bond, painted by me...
 I have found myself AFRAID to post because of the fear of SAYING my OPINION on recent events...

I believe that as a Christian, it is my responsibility to spread LOVE and not to incite people into expressing opinions that are FILLED with negativity and hatred.  I have no problem with people who disagree with me, but I DO have a problem with HOW belittled that many people make others feel for DARING to step out and to state their beliefs.

I also believe that we should NOT be posting in Anger...

I have learned on FB, that if you want to get people going, THEN simply post a NEGATIVE comment and watch the comments add up...I have fallen for this too many times to count...

I MAY/May NOT agree with laws that have been passed this week, it really doesn't matter that YOU know how I feel, but I DO CLAIM God's warning that we are to Give unto Caesar what is due him and unto God what is due HIM...

I am PROUD to be an AMERICAN...I do my best to live my life THANKFULLY for every person who has made a sacrifice for MY FREEDOM and I will live my life to TREAT others with the HONOR of these men and women who stand BEHIND the AMERICAN FLAG, along with other countries, doing their BEST to make sure that ALL people, throughout the world, have BASIC HUMAN RIGHTS!!  

I MAY hate a sin, but I MUST love a sinner...
I will do my best to LOVE all people and
 treat them with RESPECT
 and I EXPECT the same.

A painting with Friends Pattern by Sharon Bond adjusted to fit the surface I have...I LOVED painting this!

 I ALSO thought I would post a warm and fuzzy post about my Daddy on Father's Day, but after reading all the posts, all I could do was to CRY, so I simply went and laid down and composed myself and then, I painted the "SWEET LAND OF LIBERTY" piece pictured above, designed by Sharon Bond/PWF,  to send to my friend in Germany, who has asked to buy one...I painted it in Memory of my SILLY, SWEET DADDY, who was so loved...

This is my FIRST design that was published...HAPPY DANCE

I thought I would SHARE how Daddy pronounced the words "FROG" and "LOG" and how many times Mother and I had laughed at him~~these two words rhymed when he said them, and he said them so that they rhymed with BLOG...He would just stick his little tongue out, ever so slightly at me...

Strangely enough, Daddy did NOT say WARSH, but he did "RENCH" out things and it would go down the "DREEN"....oh my sweet Daddy...

Sticking out his tongue was ALSO what Daddy would do when he would collect the Tithes and Offerings at our home church...When he would bring the offering plates forward, during the prayer, I would look at him from the choir, and he at me, and we would stick our tongues out at each other and GRIN...I couldn't sing in the choir for the LONGEST TIME after he died, but I kept playing the piano...

THEN there was the Sunday several months after Daddy died, that I stuck my tongue out at my friend in the congregation, and she returned the gesture ONLY to be caught by the PASTOR...you gotta be CAREFUL when you do this stuff, folks!!  It takes SKILLS...

My Second design that was published...so blessed...
Another blog thought I had was to share ONE of the reasons I paint so many frogs...

Mother LOVED to tell the joke of the BIG MOUTH FROG who went throughout the zoo after she had her first little babies...She would hop up to each animal and ask loudly and with her mouth opening VERY WIDE, "WHAT DO YOU FEED YOUR BABIES"....She asked the monkey, the snake, the cockatoo, and would end the conversation with "THANK YOU VERY MUCH."   THEN she asked the alligator: "Mother Alligator, WHAT do YOU FEED your babies"...The grumpy old alligator said, "BIG MOUTH FROGS"... Mrs. Frog said, very quietly, and through her teeth, "THANK YOU VERY MUCH"

Mother started getting FROGS as gifts, especially from her sweet Roberta, whose Parents were missionaries to Japan...

That is ONE of the reasons that I paint so many frogs, and it goes without saying, it is also a reminder to Fully Rely On God...

I NEVER want to forget all that my parents did for me and I want to remind people that the LOVE and SUPPORT of my Parents runs through EVERY stroke of my paintbrush...

I am GRATEFUL for the GIFT of Painting!!

HONOR your FATHER and your MOTHER...even their memories!

I am doing my best to make them PROUD!  We had the best family...we were taught GOD, FAMILY and COUNTRY...I will continue to do my best to LIVE what they taught me and to REMEMBER WHO I AM and WHOSE I am...I will ALSO try to do better about Blogging....Blessings to YOU...~charlotte


Oh, I DID start adding my Painting Patterns to the 
TOP of my blog and linking them to my etsy shop!!  
SO I HAVE gotten something done!  ROFL...

AND

IF you have NOT ordered you Subscription to
The NEXT issue comes out on July 1st...
It is called: Come Sail Away
I have a PROJECT in there!  =)

Saturday, June 20, 2015

Sam...Saturday, June 20, 2015

 I thought it was time to share another FREE project using DecoArt Chalky Finish...OK, I cheated and used Americana Raw Umber because I was too lazy to dig into the bottom box to get out the brown...lol  BUT, this shows you how you can easily use Americana Paint with the Chalky Finish Paints...

I wanted this to be a PRIMITIVE piece, since I was making it to sell on my Etsy's Primitive and Folkart Team (FAAP)...We are having an AUCTION today on our Page on Facebook...go join us...The sale ENDS on Sunday, June 21,2015 at 5 pm Central Time.... 
FAAP AUCTION AND SELLING PAGE (click here to go there)


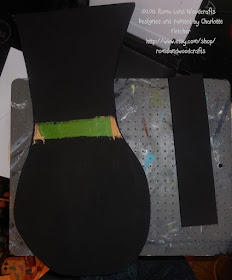
I started by adding a coat of CARBON (Black)...notice that I put tape where the hat brim will go...I also left the back of the hat brim unpainted on the back so I could wood glue them together...Glue will not HOLD pieces that are not glued raw wood on raw wood!

 I taped off the two stripes to leave the stripe that would 
be painted LACE (White)
At this point, I took an old white stick candle and put wax 
where I wanted the paint to peel.
I added the wax heavier on the edges and I avoided the area that would be the face...that is just MY preference...


 I painted the center stripe and the bottom half with LACE (a white).  I used 2 coats to get a better coverage...I KNOW, it is going to be sanded, but I think it looks better to have a good foundation.

 I removed the tape and put it on the INSIDE of the white stripes to paint the 2 red stripes...
on the sides, I painted the red down to where 
the hat brim would go...
I used 2 coats of ROUGE (RED) to paint this.


I wanted a darker blue, so I added some 
CARBON (Black) to LEGACY (Blue)
This is ready to SAND...I use my hand sander...WHOOSH.....

 Perfectly Prim!
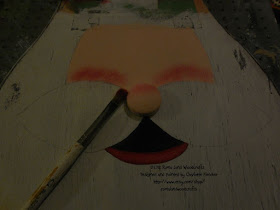
 I drew on the features with a pencil so you could see...
I used a wooden plug for the nose.
 I made the fleshtone by mixing
 LACE (white) with Smitten (Peach)...
I showed the scruffy brush that I used to add 
ROUGE (RED) to the cheeks and nose...
use VERY little paint...this is where people can make a BIG mistake...wipe almost all of the paint out of the brush for this step!
I added the mouth with CARBON (Black) and
the lips with Rouge (Red)
 I added the eyes with Carbon (Black) and 
shaded the face/moustache with RAW UMBER.  
I added highlights and the lettering with LACE (white)...
I went around the piece with my Raw Umber to give it more of an antiqued look...you could antique this if you want...
I will add 3 coats of DuraClear Ultra Matte and
 put a hanger on the back...That will be IT!!

You can EASILY paint this project 
with regular Americana Acrylics, 
but I LOVE to use the Chalky Finish Paints!!


See their AMAZING products AND
look at all the FREE patterns they offer to use these products!
 
Below, is the pattern...to save it to your computer, Right Click on the picture and choose SAVE AS...your computer might say something different, but there should be an option to save!

You are MORE than welcome to make these to sell, but PLEASE do NOT claim the pattern/instructions as your own...give me credit...Do not mass market this pattern/item...feel free to resize as you need and enjoy this quick and easy project...feel free to add YOUR STYLE to this...

I hope you have FUN with this...As you are painting, remember those who have gone before us to keep us free...LIVE your life THANKFULLY...Treat others as YOU WANT to be treated, and it is NOT your problem if they choose not to return the kindness...hang in there because KINDNESS does MATTER!!  I wish GLORIOUS...BLESSINGS to YOU...~charlotte


Tuesday, June 9, 2015

YES, I am RUSTY and LOVING it! Tuesday, June9, 2015


 I am SO EXCITED!  I never dreamed how EASY it would be to make paper mache look as though it is RUSTED!  Sure, I've painted surfaces to get a similar look, but this is AMAZING to me how simple it is and how much it really does look rusted in real life.  

I will apologize right up front for the poor quality photos.  I was so excited to try this that I got out of bed and went directly to painting without even turning on the lights!

Last night, as I was attempting to go to sleep, I had this idea, so I watched the DecoArt video by Andy Skinner, again, and decided what I would use and I just started painting.  With the use of my hairdryer, I had this process finished in about 30 minutes!

To find the videos, go to YouTube and search: DecoArt Mixed Media Rust


I used the 4 products listed above: Quinacridone Gold, Carbon Mister, Black Modeling Paste and Ultra Matte Varnish.

These products are in the new line of DecoArt Media...The fluid acrylics are strongly pigmented, so they take very little paint.  They are transparent, which gives them versatility.  They are SO MUCH fun to play with!

IF you are one of THOSE PEOPLE who think they have no use for these products, PLEASE go watch some videos and you might be surprised at what they can do to help you stretch those creative juices!  I will admit, I had NO CLUE what they were when they were introduced, but now, I have most all of the products and I plan to get MORE!

I would suggest buying the starter kit to begin your journey.  Go to DecoArt (click on the blue) to see what they offer.  While you are there, CHECK OUT the hundreds of FREE PATTERNS that are available to you...I think you will be quite pleased with the variety.
 
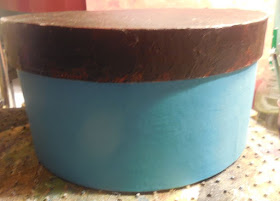
 I didn't have the exact products that were used in the video, so I did my own thing...I sure had nothing to lose.  I took the BLACK MODELING PASTE and spread it on the paper mache box randomly....I did this with my finger.  If you don't have black, then use white or even use gesso...The goal is to get some texture.  You get texture simply by stamping, so see what you have and use what you've got!


I used the Carbon (BLACK) mister to cover the box.  Don't cover it completely and leave some BLOBS...the misters leave blobs...

When this dried, I painted it with Quinacridone Gold (QG)
and THAT was IT!

To get rid of the "shine" of the paints,
 I covered them with Ultra Matte Varnish.


Look at this picture...isn't that the COOLEST THING? 
 I know, it is JUST PAINT,
 but this Paint is making me VERY HAPPY.


What would I do differently?  I would leave more of the paper mache showing because see that light brown in the pictures...it looks AMAZING!!  That light color is where I left the paper mache uncovered with paste or paint BEFORE I painted it with the QG!

I am MORE than pleased with my first attempt at doing this and I can't wait until my mind gives me more ideas...but I only hope it is NOT before I am about to fall asleep...


I used DecoArt Chalky Finish TREASURE to paint the bottom of the box.  I sanded it to give it a worn look to match the rust.


 I wanted to show how nicely you can transfer your pattern on top of the Ultra Matte Varnish.

Note to self:  Turn the transfer paper to the RIGHT SIDE because, really, tracing a pattern ONTO the BACK of the pattern does NOBODY any good...sigh...

HURRY, if you would like to buy this pattern for $1.00, go visit Susan Kelley at PUDDLES OF PAINT (click on this to take you to the site).  The sale ends on June 10, 2015!  You will WANT to buy more than ONLY one!!  CHOP CHOP...times a tickin'


 This painting, called CLASSY CHICK, is dedicated to ALL of my CLASSY CHICKS...you KNOW who you are Susan, Kathy, Lynn, Ramona, Nancy, 3 Lisa's, Michele, Suzie Q, Wendy, Mindy, Sheila, Kat, Diane, Lois, Jan, Karalee, Anne, Gloria, Judy, Margaret and WELL, I'm going to stop naming names because there are DOZENS of YOU....REALLY...LOTS of YOU and I wouldn't trade YOUR friendship for all the riches of the world, because YOU make my world RICH!


I put English Red Oxide Antiquing Creme on the bottom of the box to carry out the aged look...I really do LIKE this!  I HOPE you will give this technique a TRY..

ALWAYS embrace new opportunities...new products...new ideas...CHANGE can be your friend!  Don't be afraid and by all means, don't feed the old demon of I'VE NEVER DONE IT THAT WAY BEFORE AND I DON'T WANT TO CHANGE...you are robbing your creativity of endless possibilities!

Thanks for stopping by my little corner of the world.

Embrace Life...CELEBRATE EVERY DAY...Blessings to YOU...~charlotte